
Introduction
In today’s fast-paced business environment, providing seamless and efficient customer service across multiple communication channels is essential. Salesforce Omni-Channel feature empowers organizations to deliver consistent and personalized experiences by intelligently routing customer interactions to the most suitable agents or queues. This blog offers a comprehensive guide to implementing Omni-Channel in Salesforce Sales Cloud with Digital Engagement licenses. We’ll also explore the critical role of Omni-Supervisor in optimizing sales enablement and case management.
What is Omni-Channel?
Omni-Channel is a powerful Salesforce feature that streamlines case and task management by routing work items like cases, leads, or chat requests to the most appropriate agents. By leveraging Salesforce’s rules-based routing capabilities, Omni-Channel ensures optimal resource utilization and enhanced customer satisfaction.
Salesforce Omni-Channel is available with the Service Cloud product license or any of these add-on licenses: Digital Engagement, Messaging for In-App or Web, Service Cloud Voice (with Amazon Connect or Partner Telephony), or Workforce Management.
Key Benefits of Omni-Channel Salesforce setup:
- Efficient Work Distribution: Automatically assigns tasks based on agent skill sets, availability, and workload.
- Real-Time Monitoring: Supervisors can monitor agent activities and queue status in real time.
- Enhanced Customer Experience: Reduces wait times by routing cases to the right agent quickly.
Importance of Omni-Supervisor
Omni-Supervisor is a real-time monitoring tool within Salesforce Omni-Channel. It provides supervisors with visibility into agent workload, queue status, and service levels.
How “Omni-Supervisor Salesforce” Helps Sales Enablement Teams:
- Queue Monitoring: Supervisors can track all cases, ensuring no high-priority item goes unnoticed.
- Agent Performance Insights: Identify underperforming or overloaded agents and reassign tasks as needed.
- Service Level Optimization: Maintain SLAs by redistributing work effectively.
Step-by-Step Guide to Omni-Channel Salesforce setup with Messaging for In-App or Web Licenses
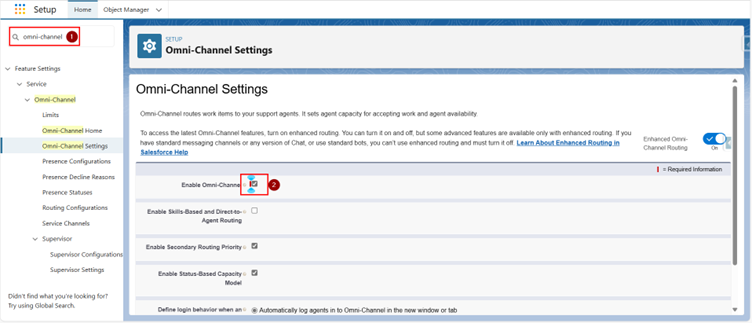
Step 1: Enable Omni-Channel
- Navigate to Setup: In Salesforce Setup, search for “Omni-Channel.”
- Enable Omni-Channel: Turn on Omni-Channel to activate its features.
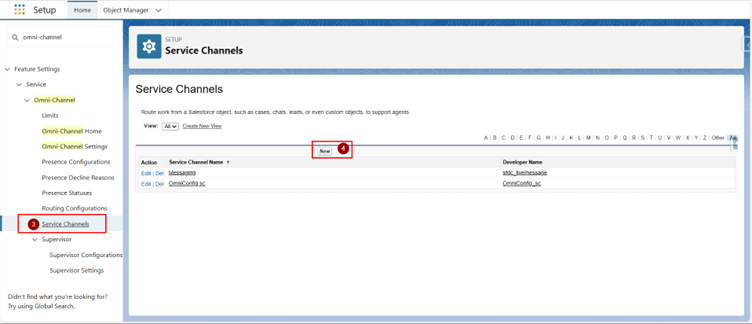
- Create Service Channels: Define the types of work items (e.g., cases, leads, or tasks) that agents will handle.
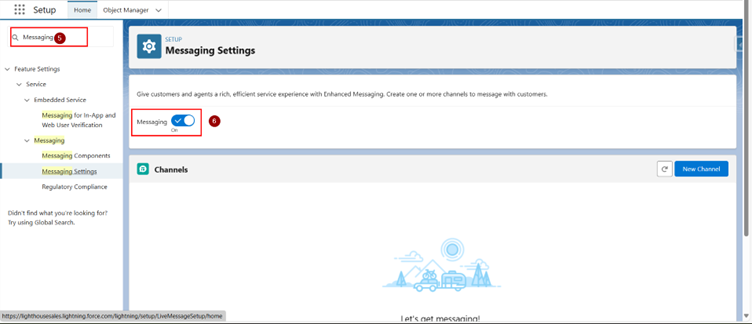
- Enable Messaging: Search For “Messaging Settings” in Quick find box, make sure Messaging toggle is enabled.
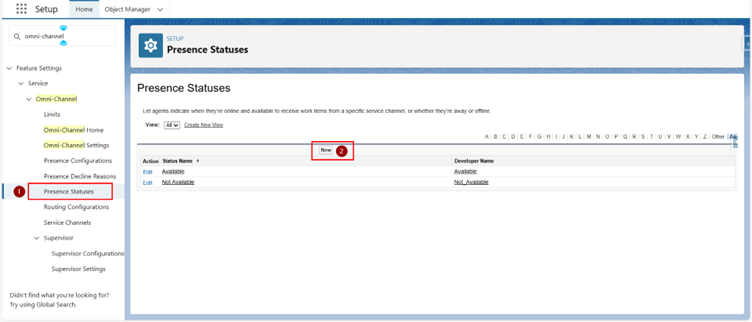
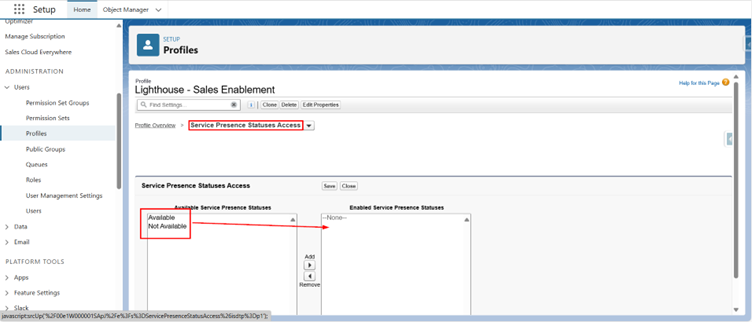
Step 2: Configure Presence Statuses
- Go to Presence Statuses under Omni-Channel Settings.
- Create statuses such as “Available,” “Offline,” and “Busy.”
- Assign statuses to specific agent profiles, make sure agents have “Messaging for In-App and Web User” Permission set and License assigned.

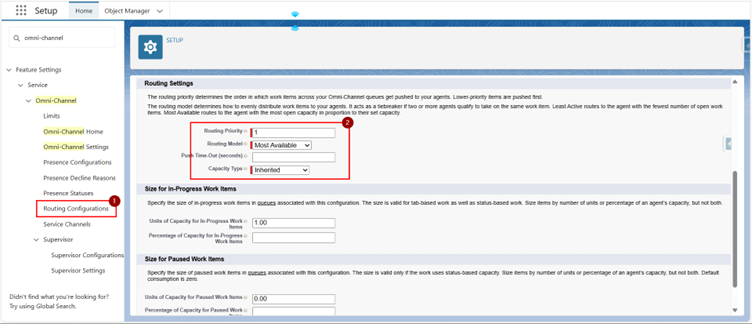
Step 3: Set Up Routing Configurations
- Navigate to Routing Configurations in Setup.
- Define routing rules based on agent skills, capacity, or workload.
- Assign priorities to ensure high-value cases are handled first.
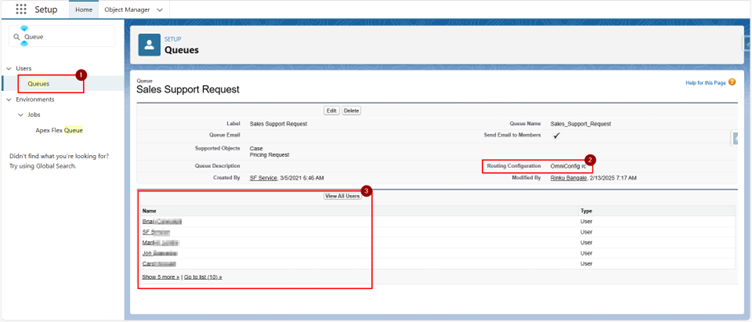
Step 4: Create Queues
- Go to Queues in Setup.
- Create queues for different types of work items, such as product support or billing inquiries.
- Assign the appropriate users or public groups to each queue.
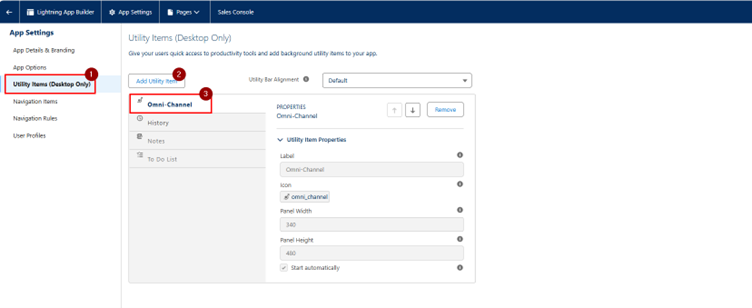
Step 5: Configure Omni-Channel Utility in App
- Add the Omni-Channel Utility to your Salesforce app via the App Manager.
- Ensure agents can view and accept work items directly from the Omni-Channel widget.
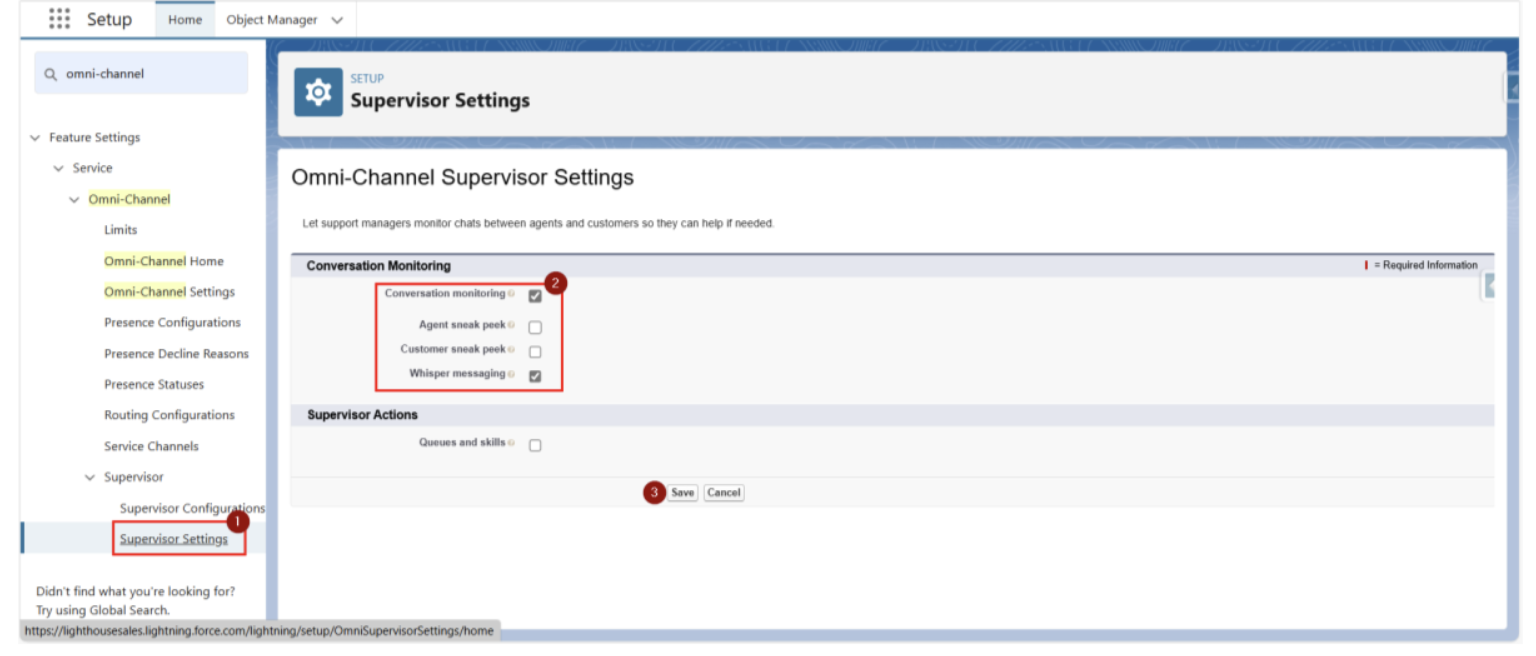
Step 6: Monitor with Omni-Supervisor
- Add the Omni-Supervisor tab to the Service Console app.
- Train supervisors to use it for real-time monitoring of queues, agent statuses, and case progress.
Optimizing Sales Enablement with Omni-Channel
Omni-Channel plays a pivotal role in helping sales enablement teams manage cases efficiently. By routing work to the right agents, teams can focus on:
- Improved Case Resolution: Quickly address customer inquiries to build trust and loyalty.
- Workload Balancing: Prevent agent burnout by distributing tasks evenly.
- Enhanced Collaboration: Facilitate cross-team collaboration with better visibility into queues and case statuses.
Use Case Example: A sales enablement team receives inquiries about product demos, pricing, and post-sales support. Using Salesforce Omni-Channel, these cases are routed to specialized agents based on expertise, ensuring faster resolution and a better customer experience.
If the above information feels insufficient, you can also check out Salesforce implementation services for broader insights.
Conclusion
Implementing Omni-Channel in Salesforce Sales Cloud services with Digital Engagement licenses is a game-changer for organizations aiming to elevate customer service and streamline case management. By following the steps outlined in this guide, you can unlock the full potential of Omni-Channel to empower your sales enablement team, enhance productivity, and deliver exceptional customer experiences.
Start your Omni-Channel journey today and witness the transformation in how your team handles customer interactions across multiple channels seamlessly!


