Introduction
Today there’s no time to waste on manual processes or outdated workflows. For financial institutions striving to stay competitive, speed, accuracy, and seamless customer experiences are crucial. That’s where Financial Services Cloud (FSC) Automation with OmniStudio comes in—a game-changer designed to transform your service delivery and operational efficiency like never before.
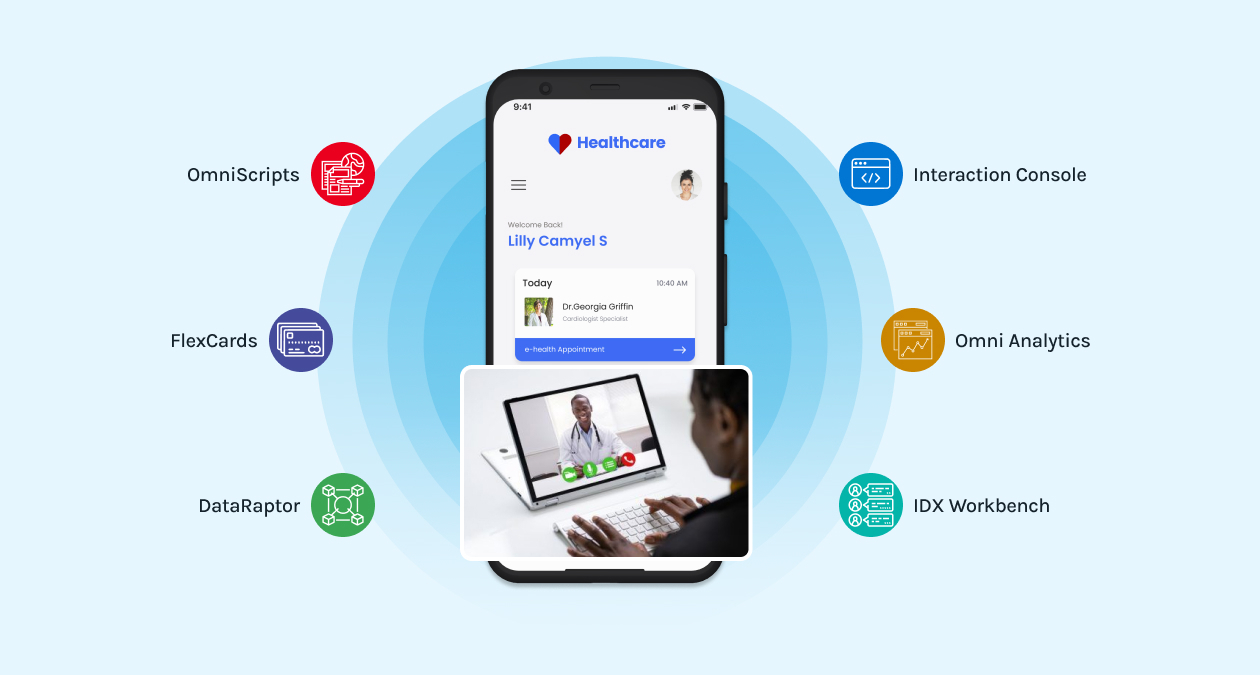
Financial Services Cloud (FSC) provides an integrated platform that enables financial services organizations to manage customer relationships effectively. By leveraging Salesforce OmniStudio, we can further enhance the automation capabilities of FSC, making processes efficient and user-friendly. This blog will cover various automation features using OmniStudio, including the FlexCard Designer, DataRaptors, FlexCards, and OmniScripts.
Introduction to OmniStudio for FSC Automation
OmniStudio in Salesforce is a powerful toolkit that allows developers to create guided user experiences and automate complex business processes. Tailored for complex, data-rich industries like financial services, OmniStudio enables organizations to create streamlined, customer-centric processes through intuitive drag-and-drop interfaces, data management tools, and automation components.
With OmniStudio, you’re not only building a better customer experience but also empowering your teams to work smarter. It allows you to automate key workflows—like client onboarding, account updates, and data-driven decision-making—making interactions faster and more efficient. OmniStudio’s blend of FlexCards, OmniScripts, and Integration Procedures delivers robust automation that’s adaptable to changing needs.
Use Case for FSC Automation with OmniStudio
Imagine a scenario where a financial advisor needs to manage and visualize all relevant information about a client in one place—this includes recent transactions, account balances, related opportunities, and customer profiles. With OmniStudio, you can create a customized, interactive interface using FlexCards that brings all this data into a single view.
Here’s where OmniStudio for financial service cloud can make a transformative impact:
Client Onboarding Automation: OmniStudio can streamline and automate the onboarding process, reducing manual data entry and document handling. With OmniScripts guiding advisors through a series of intuitive steps, client onboarding becomes a seamless experience. Compliance checks, KYC (Know Your Customer) verification, and financial profile setup can be automated, cutting onboarding time from days to hours.
Portfolio Monitoring and Alerts: With FlexCards in OmniStudio, advisors get real-time, dynamic views of client portfolios, highlighting key insights like recent transactions, market trends, or changes in client risk profiles. Advisors can receive automatic alerts triggered by specific portfolio changes, enabling them to respond proactively and deliver timely recommendations.
Automated Account Updates: OmniStudio's Integration Procedures can connect with external systems to pull or push updates automatically, ensuring account data stays current across platforms. For example, if a client updates their contact information or financial status, these changes can reflect instantly across all relevant systems, without manual intervention.
Enhanced Client Communication: By using OmniScripts to automate responses and next-best action suggestions, advisors can provide clients with faster, more personalized communication. Advisors can also use automation to generate pre-filled forms and reports, reducing time spent on repetitive documentation.
Steps for FSC Automation with OmniStudio
Step 1. FlexCard Designer
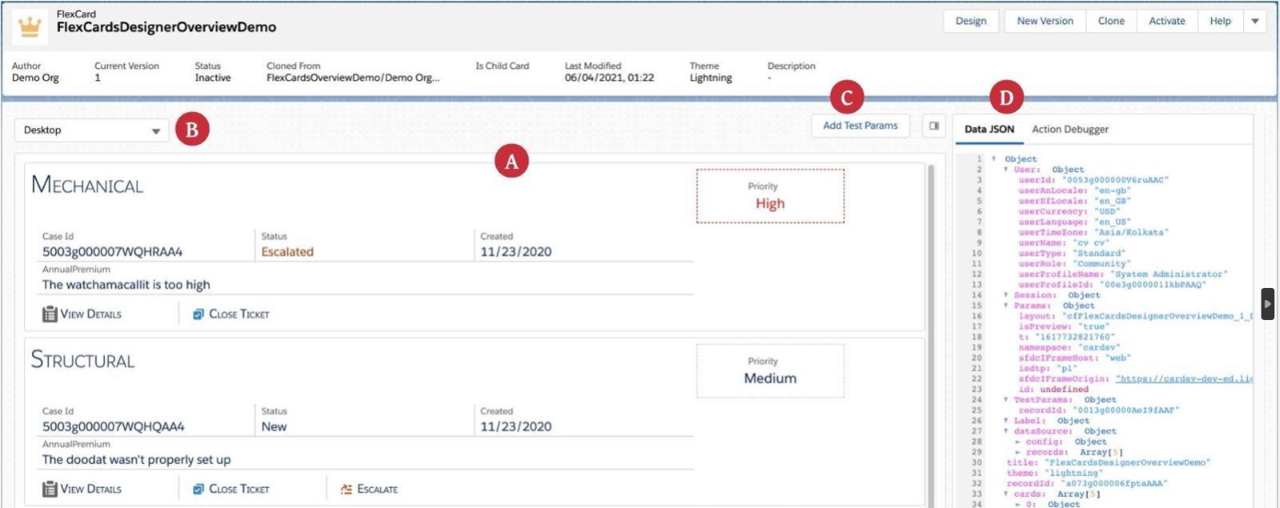
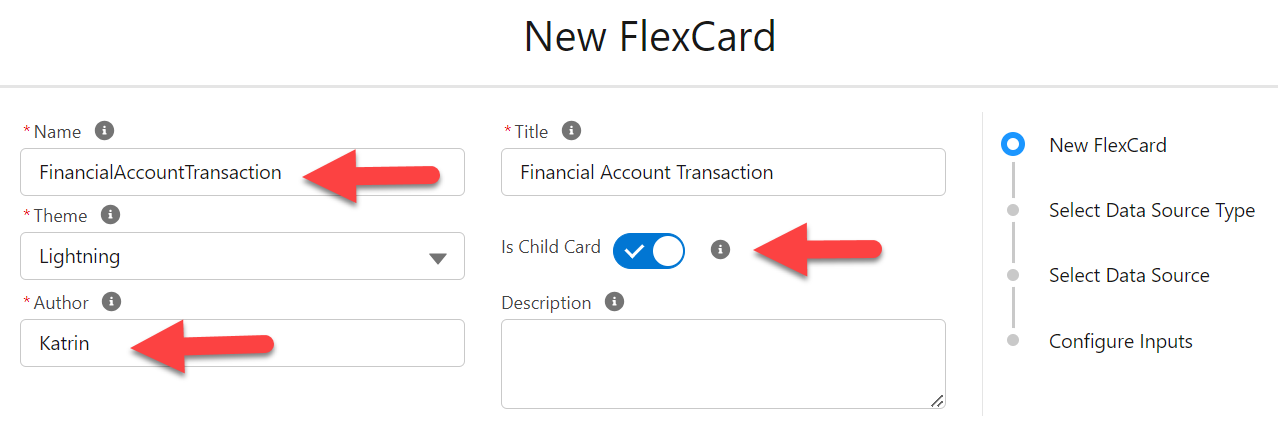
FlexCard Designer is used to create interactive cards that display contextual information about a record in Salesforce. The cards are highly customizable and can present data in an appealing format.
1. Open the FlexCard Designer
- Navigate to OmniStudio App in Salesforce, then go to OmniStudio FlexCards.
- Click on New FlexCard to create a new FlexCard.
2. Designing the FlexCard
- Enter the name of your FlexCard, such as "Client Overview Card."
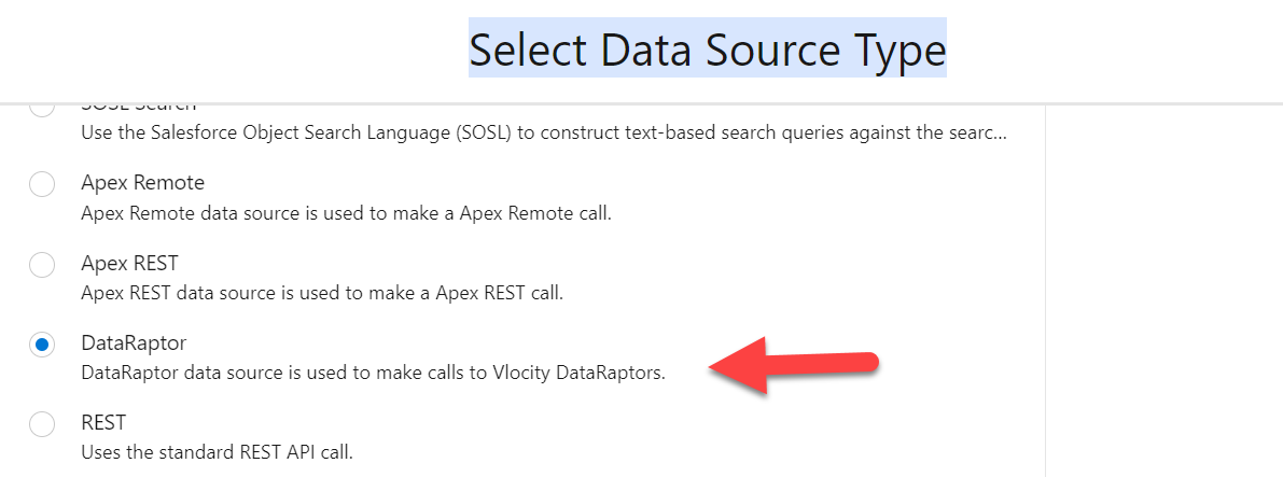
- Define the Data Source. The data source can be a Salesforce object, REST API, or DataRaptor.
- Add elements like Fields, Images, and Actions to design the layout.
3. Adding Data Elements
- Use the Data Source Panel to drag and drop fields such as customer name, account balance, and open opportunities.
- Use Styling Settings to customize the card’s look and feel.

Step 2. Create DataRaptors & FlexCards
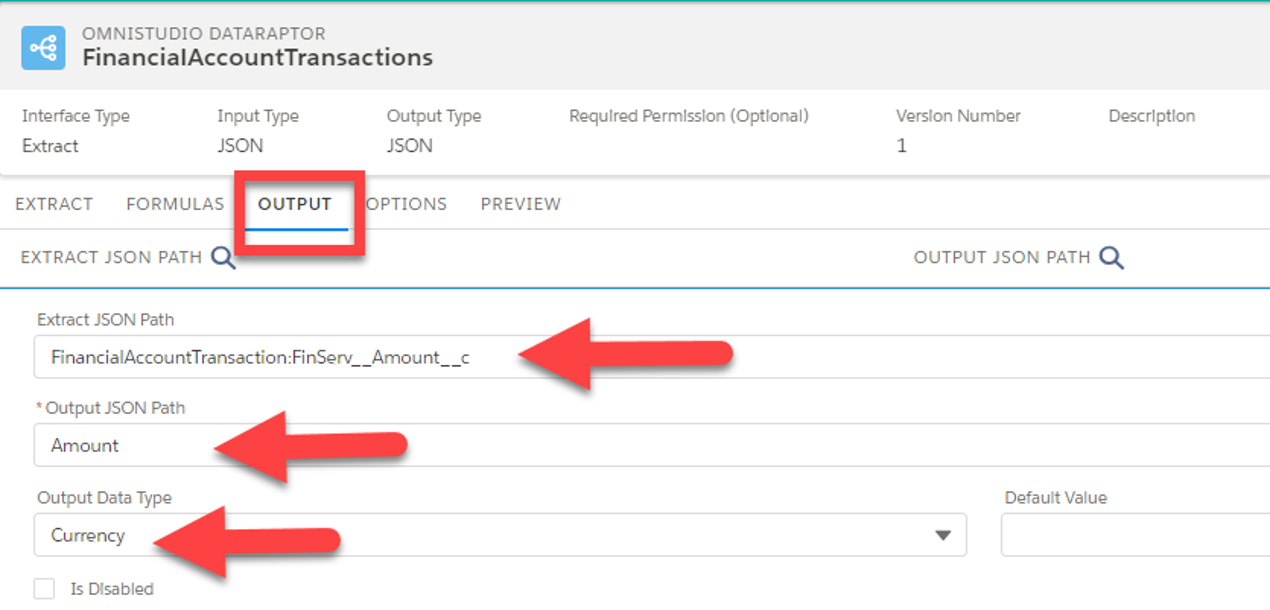
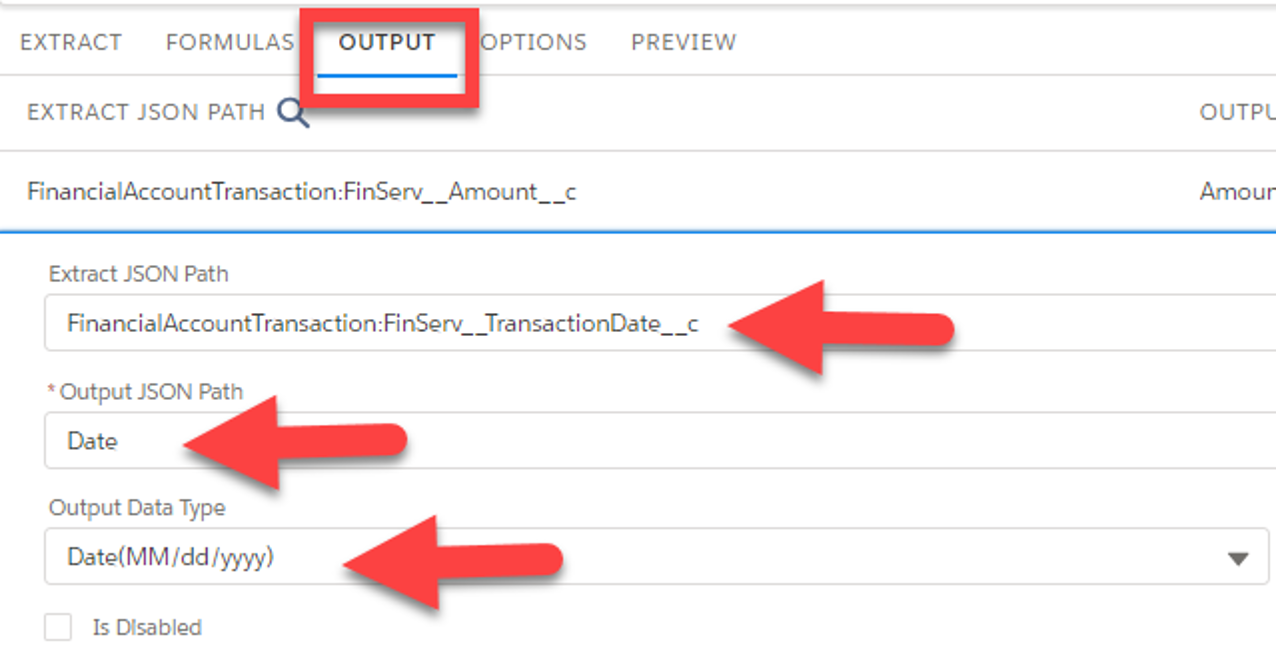
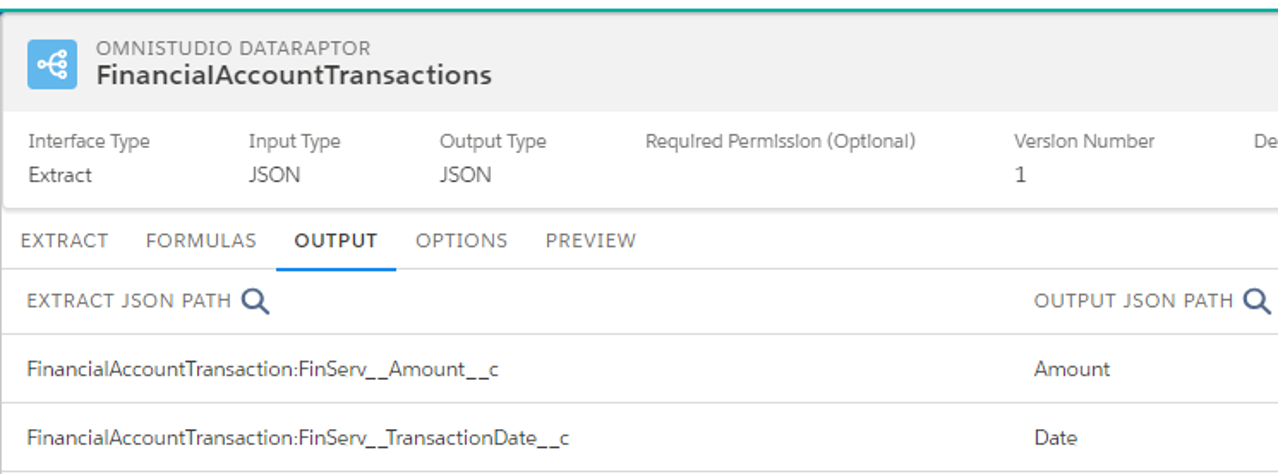
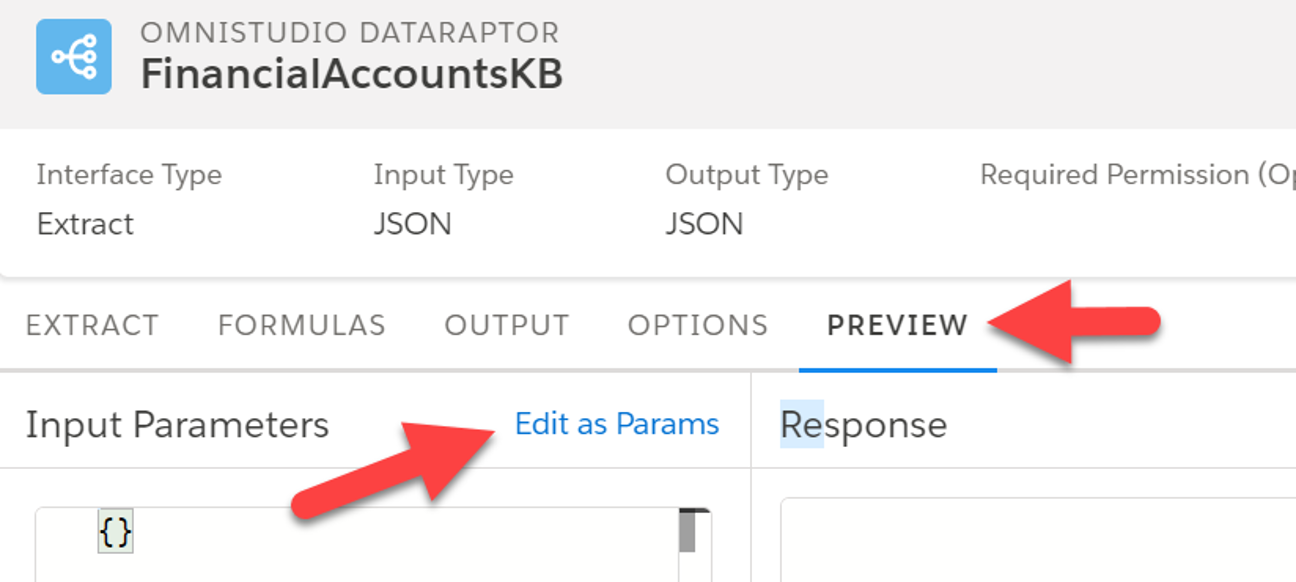
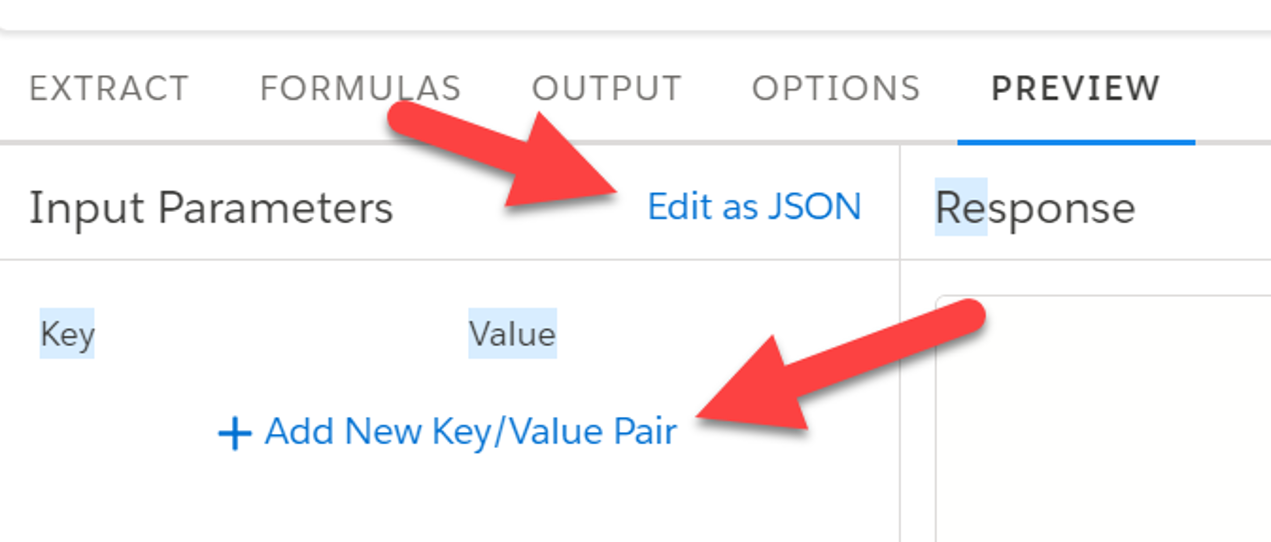
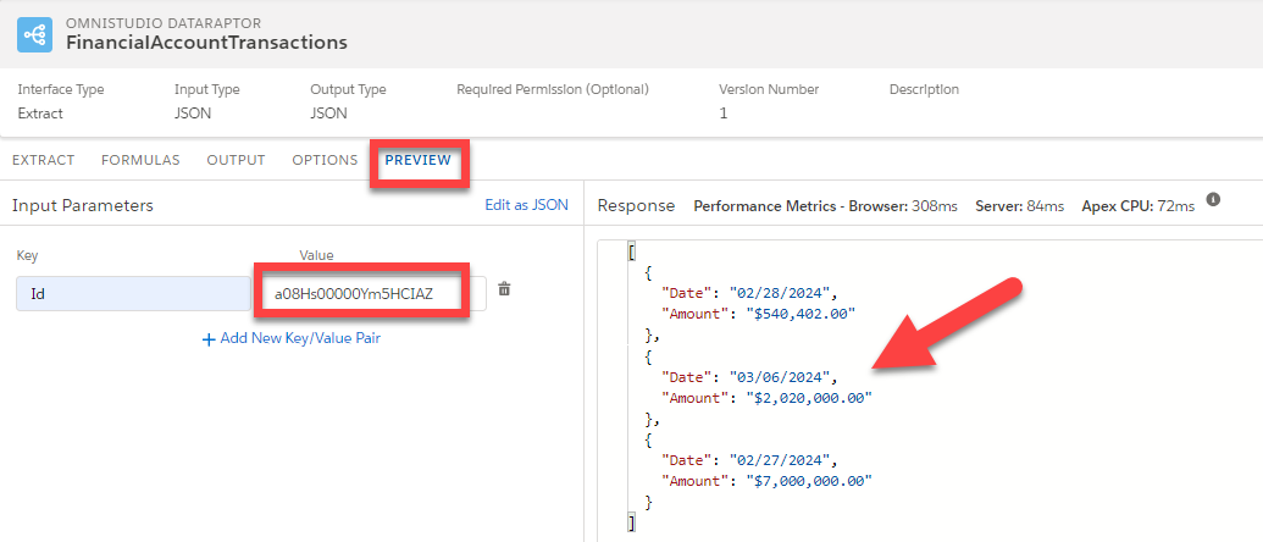
DataRaptors are used to extract, transform, and load data from Salesforce, serving as a data interface for FlexCards.
1. Creating a DataRaptor
- In the OmniStudio App, go to OmniStudio DataRaptors and click on New DataRaptor.
- Choose DataRaptor Extract to extract data from Salesforce.
- Define the Input Object, such as "Account," and map the fields you want to extract.
2. Connecting DataRaptor to FlexCard
- Edit the FlexCard created in Step 1.
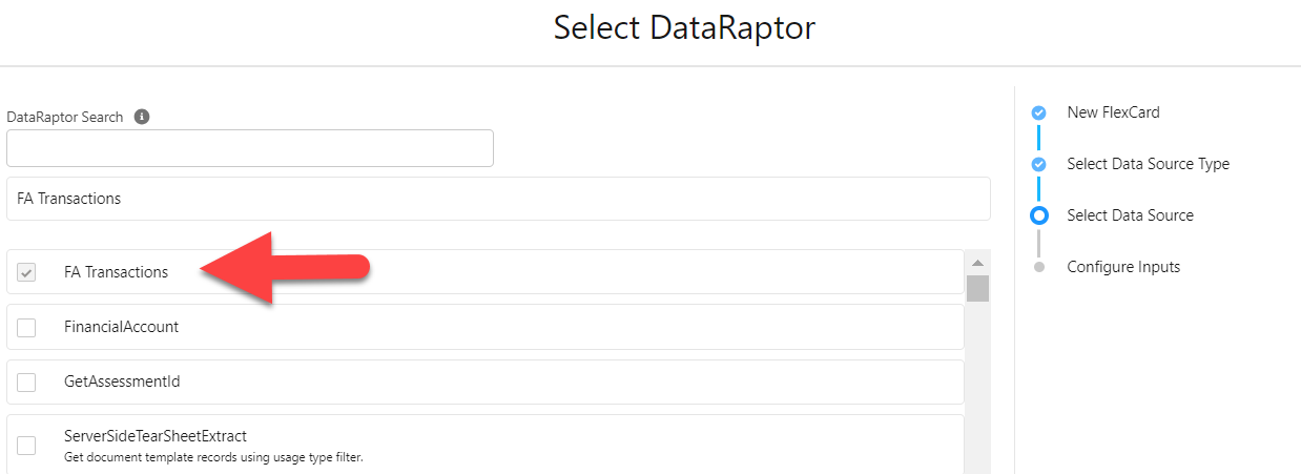
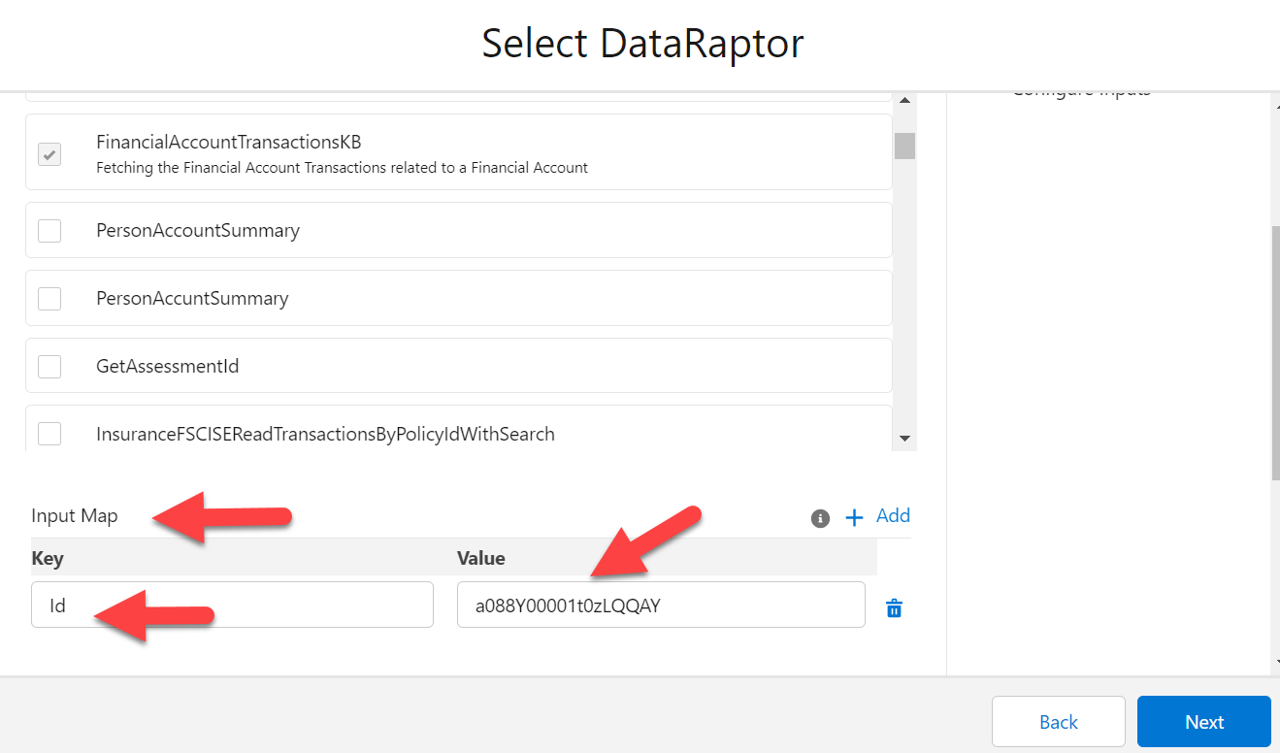
- Set the Data Source to the DataRaptor you created.
- Map the extracted fields to the card elements.


Step 3. Configure the FlexCard in the FlexCard Designer
Activate the Vlocity Card Designer Lighting Record Page
Next, we need to activate the Vlocity Card Designer Lighting Record Page
- In the OmniStudio App, go to OmniStudio DataRaptors and click on New DataRaptor.
- Choose DataRaptor Extract to extract data from Salesforce.
- Define the Input Object, such as "Account," and map the fields you want to extract.
1. Set up Layout and Actions
- Use Conditional View to show different layouts based on the data (e.g., displaying a different set of actions if a client has overdue payments).
- Add Actions such as "Schedule Appointment" or "Send Email" directly on the card.

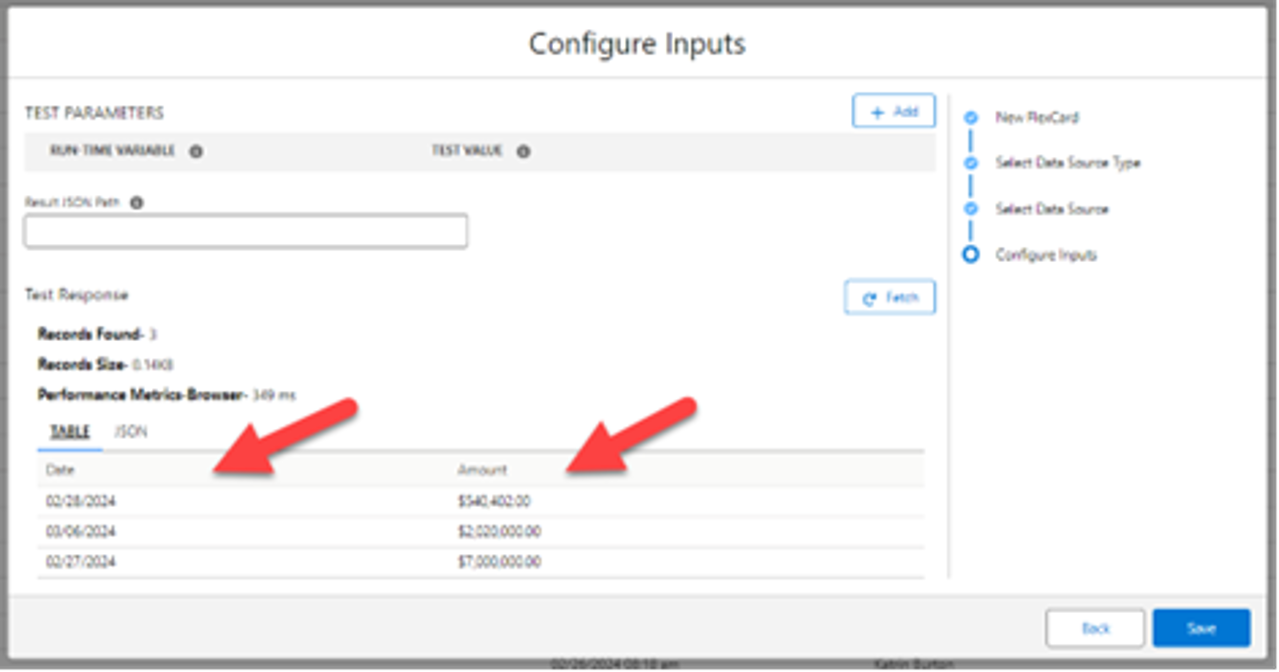
2. Preview the FlexCard
- Once you’ve configured the card, use the Preview button to see the result.
Step 4. Configure OmniScripts
OmniScripts provide guided processes, making it easier for users to complete tasks. You can use them for scenarios such as capturing new client information, managing service requests, or onboarding new accounts.
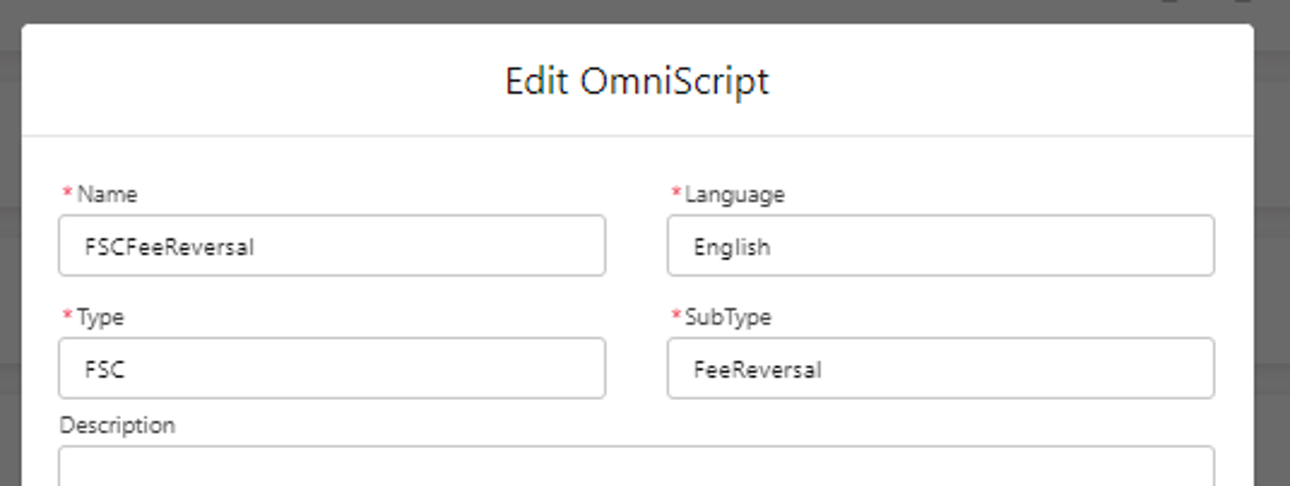
- From the App Launcher, find and select OmniScript and click New.
- Enter Name, Type, Subtype and Description.
- OmniScript will be listed in the list View by Type and language.
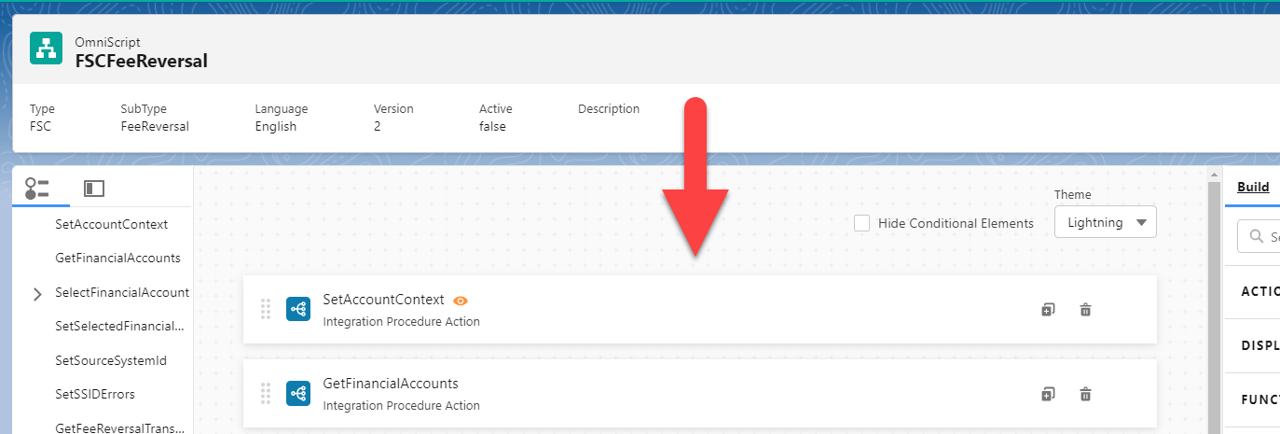
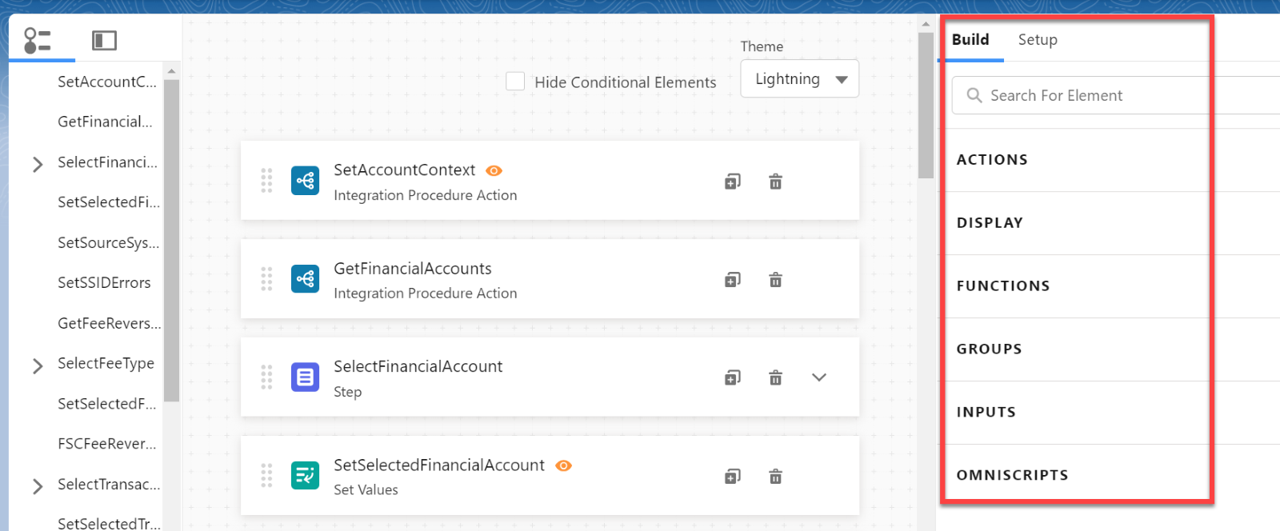
- Now we are using the OmniScript Designer which is a canvas where you can play around with different components.
- The header tells you Type, Subtype and Language
- It shows you the structure and Steps of your OmniScript
- And in the centre with have a Canvas where you can add the different elements and Steps via drag and drop.
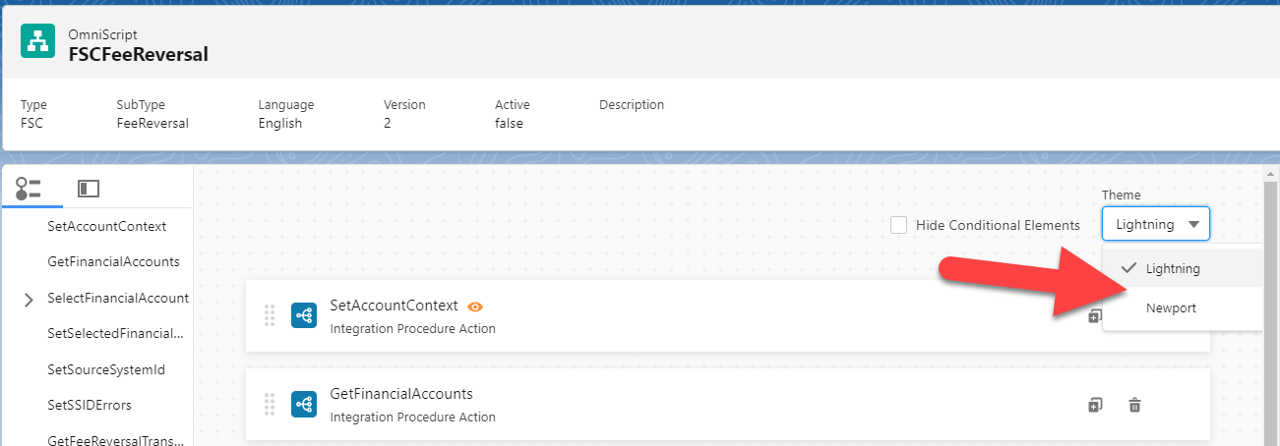
- We have 2 kinds of themes available: Lightning and
Newport.
- Lightning is typical Salesforce
- Newport is a newer way of rendering the elements
- On the right side we have the panel with Build Tab and Set-up Tab
- Under the build Tab your dropdowns for element features (Action, Groups, Input and OmniScripts.)
- Action: If you want to trigger an action on related information - you can find them here.
- Display: It is a static display, it can be a line break or a Text Block.
- Functions: If you want to add a formula or some messaging, you will use Functions on any kind of element.
- Groups: If you want to group elements together you can use this.
- Input: If you must enter an input - the input will be found in this panel.
- OmniScripts: You can embed an OmniScript into an OmniScript, this helps with the reusability and speeds up development.
- Under Build Tab > Groups add the “Step” Element to the canvas.
- To Add Elements to Step 1, you click the dropdown arrow.
- From Build Tab > Input dropdown add the Element Text to Step 1.
- Click on the Properties Tab and add Name “FirstName” & Label “First Name”.
- Add another Text Element and label it “Last Name”.
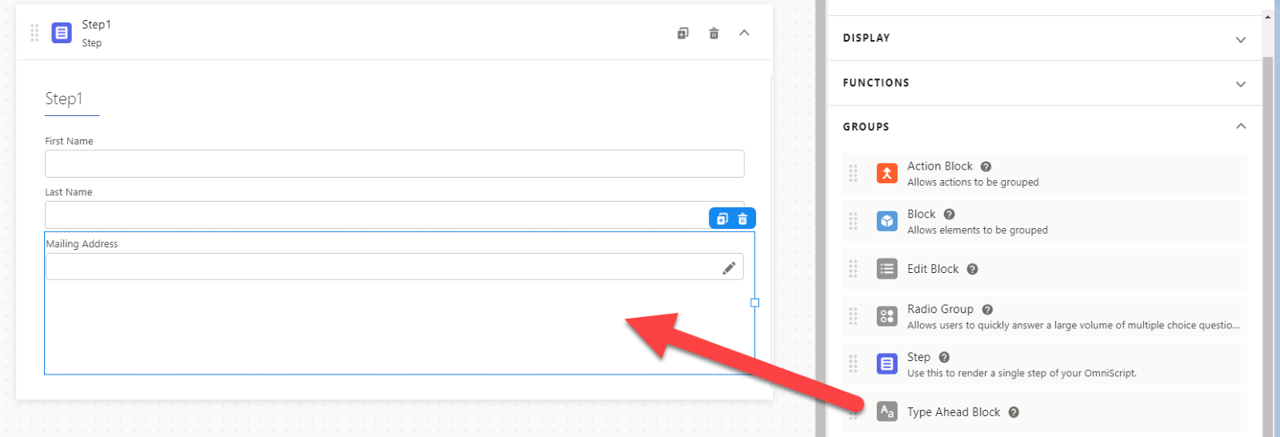
- Go to the Groups Tab and add a “Type Ahead Block” and name & label it as Mailing Address.
- To configure this to click on the Mailing
Address Block and then switch to the Properties Tab.
A Type Ahead Block runs queries in real time, and it fetches your results. For example, using the Google Maps APIs - if you start tying an address, it does a query to Google Maps and starts filling out the information. So, as I type, this is making an API call to Google Maps.
To get this to work you have to configure an authentication using a Google Maps API Key (I think Google is charging for this). As you enter an address, you will get a verified address from Google. You have an option to show a small Map.
This really shows that OmniScripts are advanced & powerful User Interfaces.
- Check the box “Enable Google Maps Autocomplete”.
- You enter a Google Maps API Key AlzaSyACXXKxtzJEJa5nutk3m28tr9J3o7-bK3w under Google Maps API Key.
- Uncheck the “Hide Map” box.

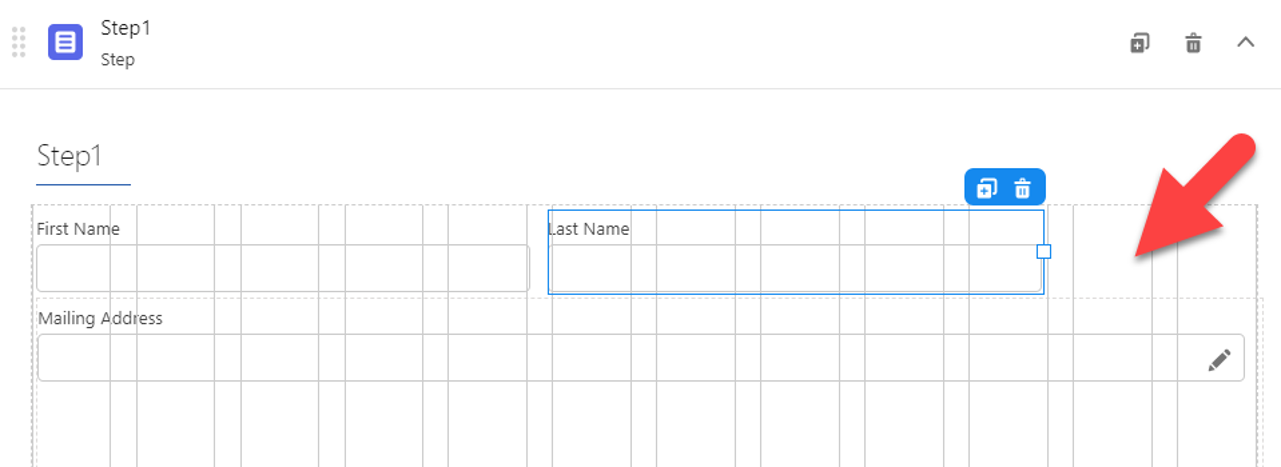
Now let’s arrange the Elements onto an address view. On the Canvas you have a 12-column space where you can arrange your elements. - Click on the right side of the Test box to change the box size & location.
- When you do that, you can see the 12-column space on the Canvas.
- Now switch to Preview Mode and test your new Step 1.
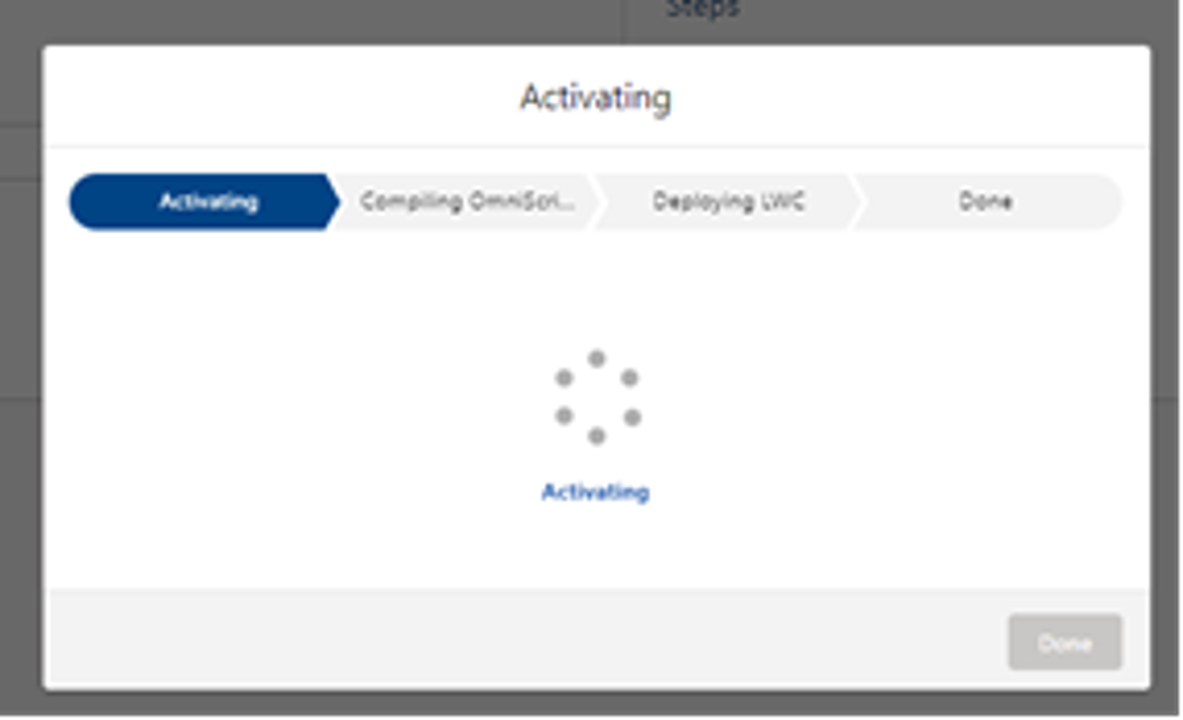
- Activate the OmniScript.



Let’s take a closer look at some cool features and build Step to capture an address.



Additional Tips for Automation
By following these steps, FSC users can create an automated, user-friendly experience that streamlines customer interactions and helps financial advisors make informed decisions in real-time.
- Conditional Data : Use DataRaptor Transforms to manipulate data for more advanced use cases.
- Styling & Branding : Customize FlexCards and OmniScripts to align with your organization's branding guidelines.
- Reusability : Create reusable OmniStudio components to ensure consistency across multiple business processes.
Conclusion
OmniStudio for Financial Services Cloud isn’t just an upgrade; it’s a game-changer. By integrating automation directly into the heart of FSC, financial firms can redefine client service, streamline operations, and free up valuable time for advisors to focus on strategic, high-impact tasks.
From onboarding to real-time portfolio monitoring and enhanced client communication, OmniStudio’s flexible and powerful tools open new possibilities for delivering faster, more personalized, and compliant services. This automation not only boosts internal efficiency but also creates a seamless experience for clients, building trust and satisfaction in every interaction.
As the financial services landscape becomes increasingly complex, FSC Automation with OmniStudio offers a proactive approach to staying ahead of the curve. Ready to transform your service delivery? SedCloudCRM’s OmniStudio and FSC have you covered, ensuring you’re prepared for today’s challenges—and tomorrow’s opportunities. Talk to our experts today!
