Introduction
Every missed connection is a missed opportunity. Hard bounces—emails that fail to deliver due to invalid addresses—don’t just hurt your campaigns; they can damage your sender reputation and hinder your ability to engage your audience effectively.
But what if you could tackle this challenge head-on, automatically and effortlessly?
Enter Auto Suppression Lists, your secret weapon for keeping your contact database clean and your email campaigns on point. By configuring these lists to handle hard bounces, you can protect your sender reputation, boost deliverability, and focus on what truly matters—building meaningful connections with your audience.
In this blog, we’ll guide you through the ins and outs of configuring Auto Suppression Lists for hard bounces in Salesforce Marketing Cloud Engagement which will help you ensure every email lands where it belongs—in the right inbox.
Implementing Auto-Suppression in Salesforce Marketing Cloud
Implementing auto-suppression lists in Salesforce Marketing Cloud (SFMC) is a game-changer for email marketers aiming for precision and efficiency. This powerful feature ensures that your campaigns bypass contacts who are unlikely to engage, such as those with hard bounce histories, improving both your sender reputation and campaign performance.
Handling hard bounce data, we can maintain a reliable inbox, thus improving list hygiene and elevating the overall effectiveness of your marketing efforts. It’s not just about better metrics—it’s about building trust and credibility while safeguarding your IP reputation.
Assign a suppression list for use across an entire Marketing Cloud Engagement tenant or for specific business units for specific send classifications. You can assign auto-suppression lists at different levels of your account. Suppression lists filter out email addresses and prevent those addresses from receiving Email Studio messages. Suppression lists serve as a do-not-contact list for your email sends. Auto-suppression lists typically include addresses with a history of spam complaints, unsubscribe lists from previous providers or advertisers, addresses of your competitors, and canceled customers.
Marketing Cloud require below tasks for Hard bounce – Auto Suppression list configuration:
- Auto Suppression list configuration in Email Studio Admin
- Automation Studio (SQL Query Activity, Verification, Data Extract Activity, File Transfer Activity, Import Activity)
- Data Extension to store hard bounce records
Auto-Suppression List Configuration in Email Studio
Here’s a breakdown of the key tasks involved:
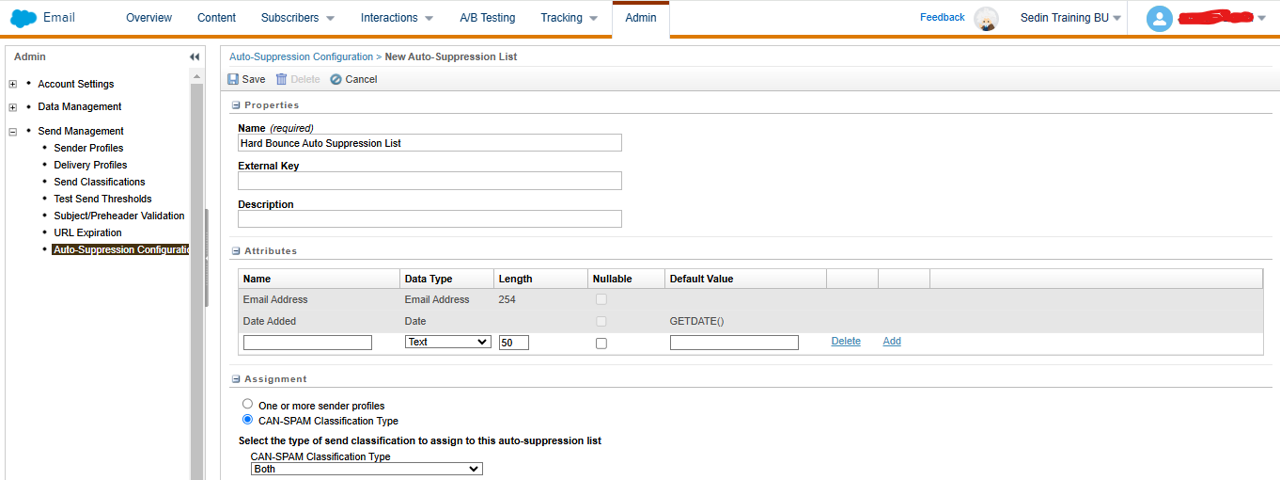
- Log into Marketing Cloud.
- Go to Email Studio >> Admin >> Auto-Suppression
List Configuration
- Click Create
- Give Name and Description
- The default attributes ‘Email Address’ and ‘Date Added’ will be there. We can add custom fields also.
- In assignment Check CAN-SPAM Classification Type as Both in the dropdown and Save
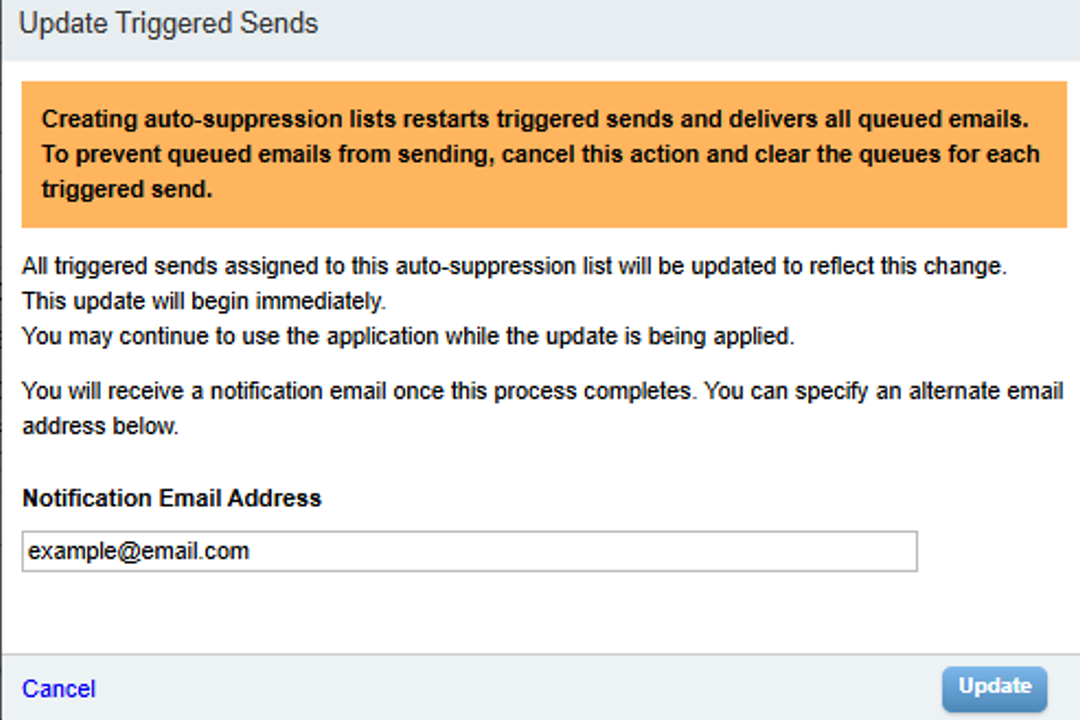
- Give the email address to get the notification after completing the process and Click Update
Automation Studio
Here’s a breakdown of the key tasks involved:
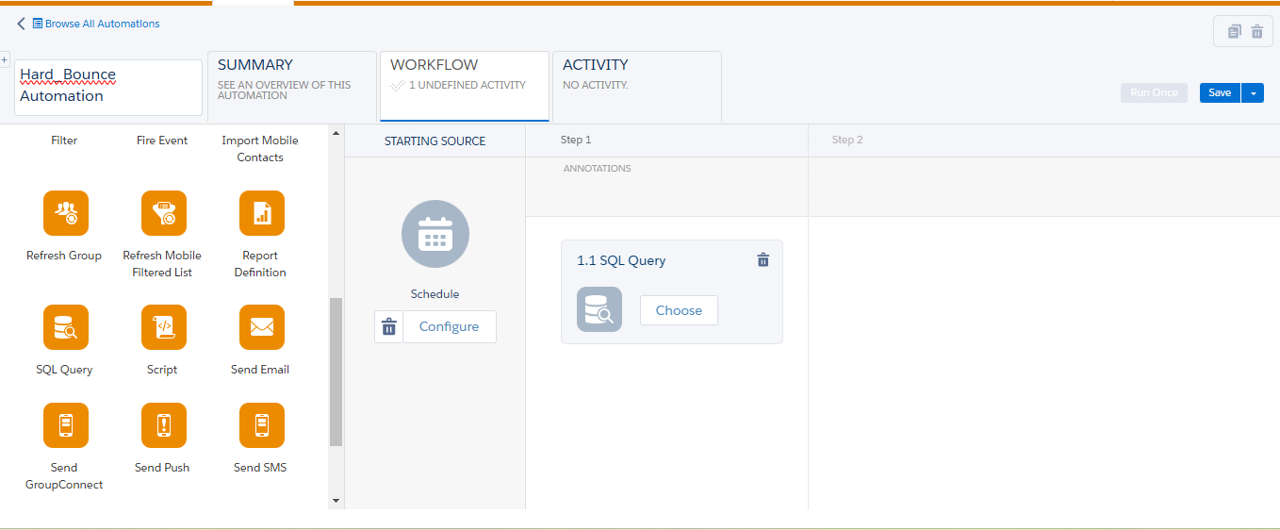
- Navigate to Automation Studio --> New Automation
- Name the Automation, Drag Schedule as Starting Source
SQL Query Activity
- Drag SQL Query Activity to the canvas
- Choose SQL query activity and click on “Create New Query Activity”
- Give Name, Description and click Next.
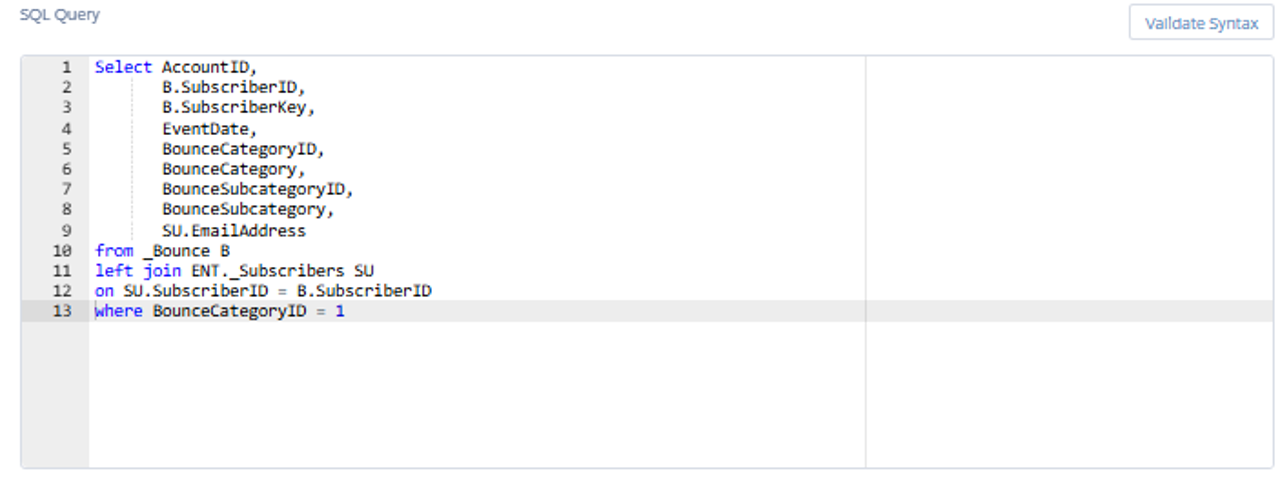
- Write SQL query
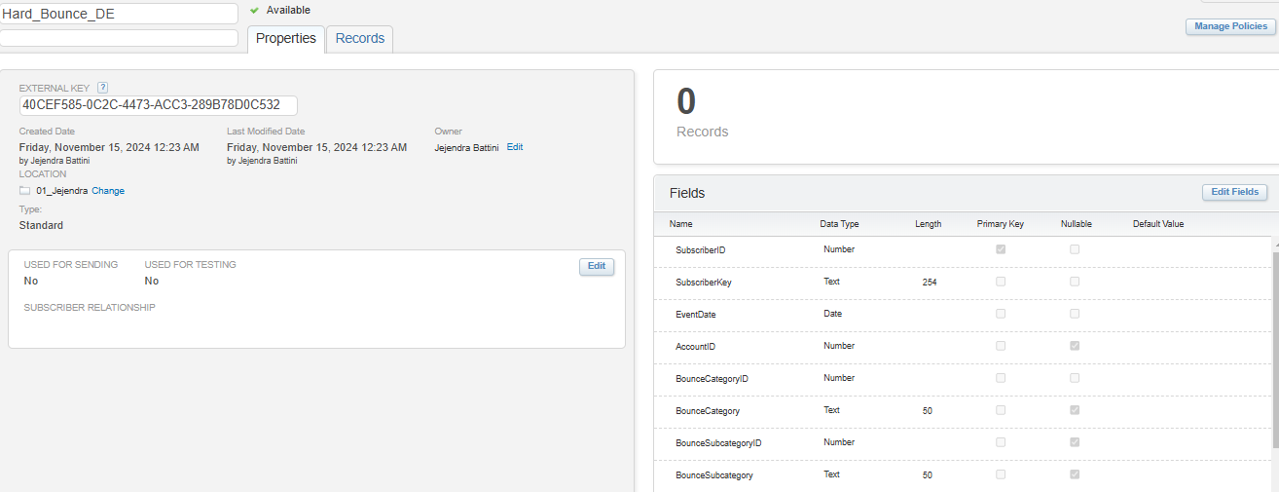
- Open Duplicate tab, navigate to Email Studio/ Contact Builder and create data extension with required fields to store the data as a result of the above query.
- Go to Automation tab and finish the SQL query activity

Select AccountID,
B.SubscriberID,
B.SubscriberKey,
EventDate,
BounceCategoryID,
BounceCategory,
BounceSubcategoryID,
BounceSubcategory,
SU.EmailAddress
from _Bounce B
left join ENT._Subscribers SU
on SU.SubscriberID = B.SubscriberID
where BounceCategoryID = 1
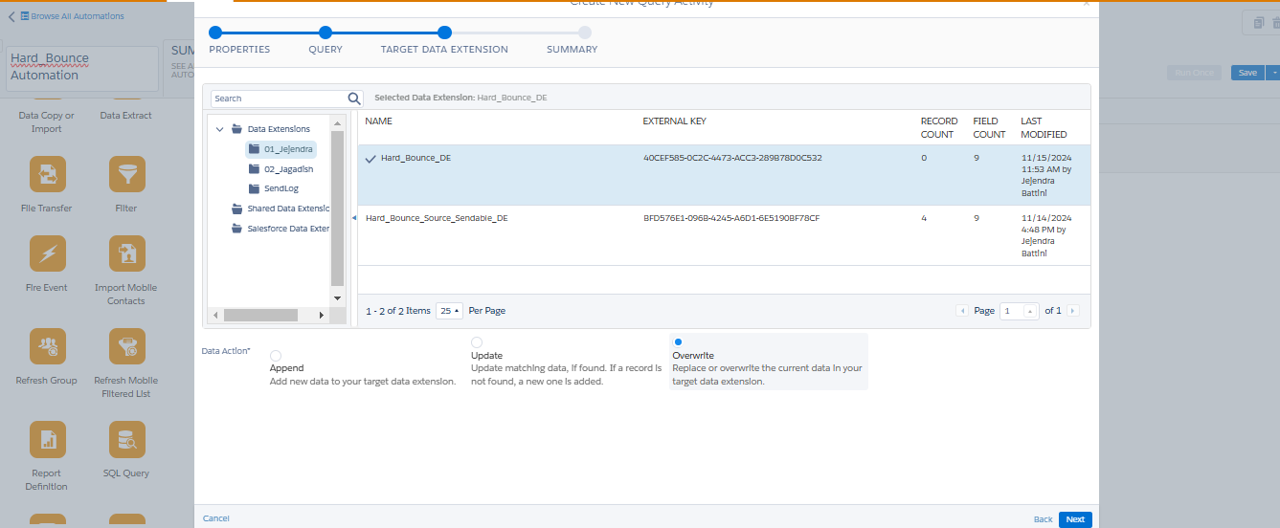
1. Select Data Extension as destination, Update type as Overwrite and click Next, Summary and Finish
Verification
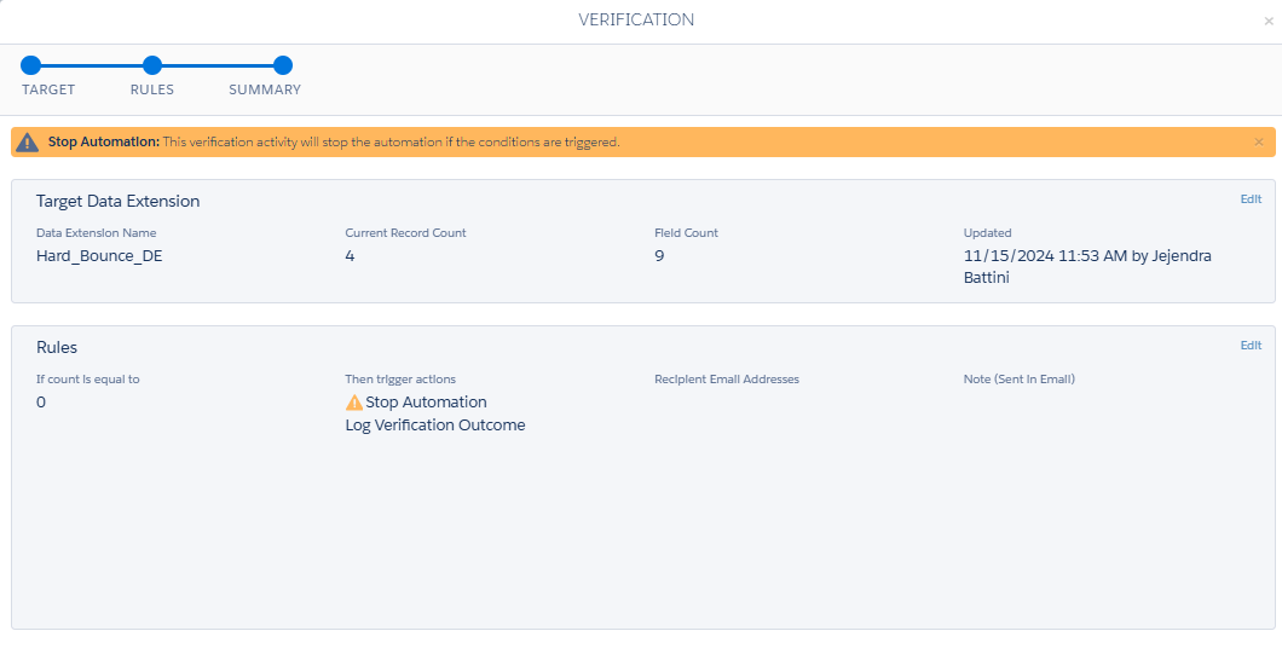
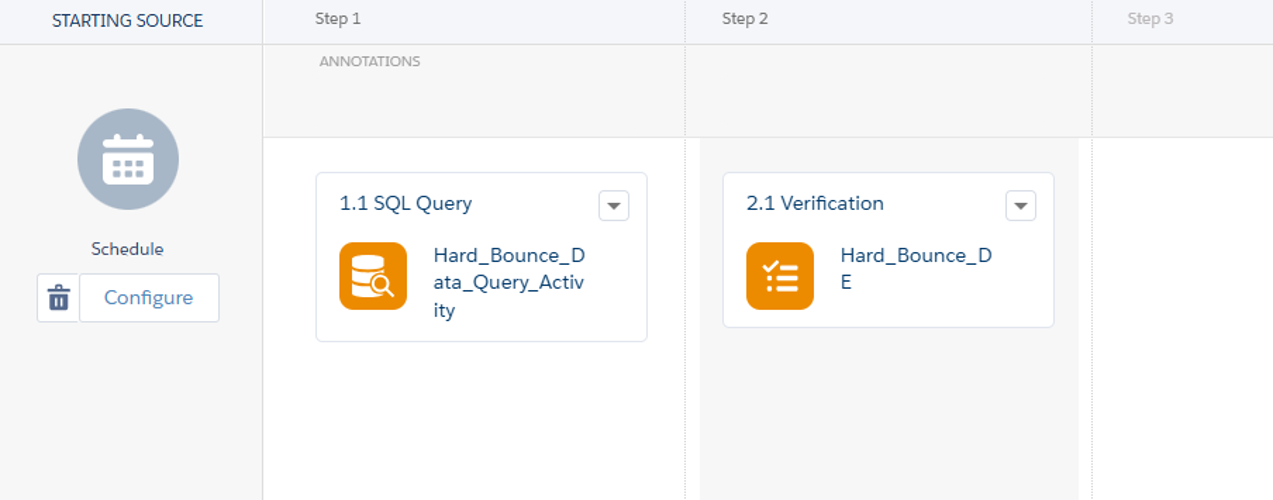
- Drag verification activity as Step 2.1. Give condition that “If record count is equal to 0” then Stop the Automation.
Data Extract Activity
- Drag Data Extract Activity to the step 3.1
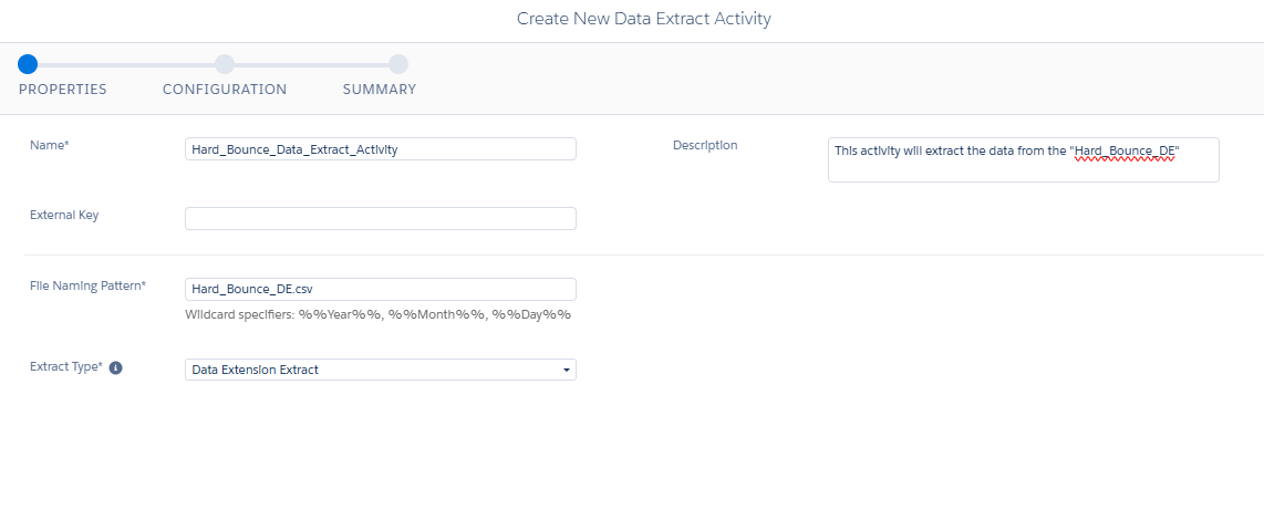
- Click Choose and create New Data Extract Activity
- Give Name, Description
- Give file naming pattern with .csv extension
- Select Extract type as Data Extension Extract
- Click Next
- Take ‘,’ as delimiter text, Copy DE external key in DE customer key and check the box for Has Column header click Next
- Summary and finish it.

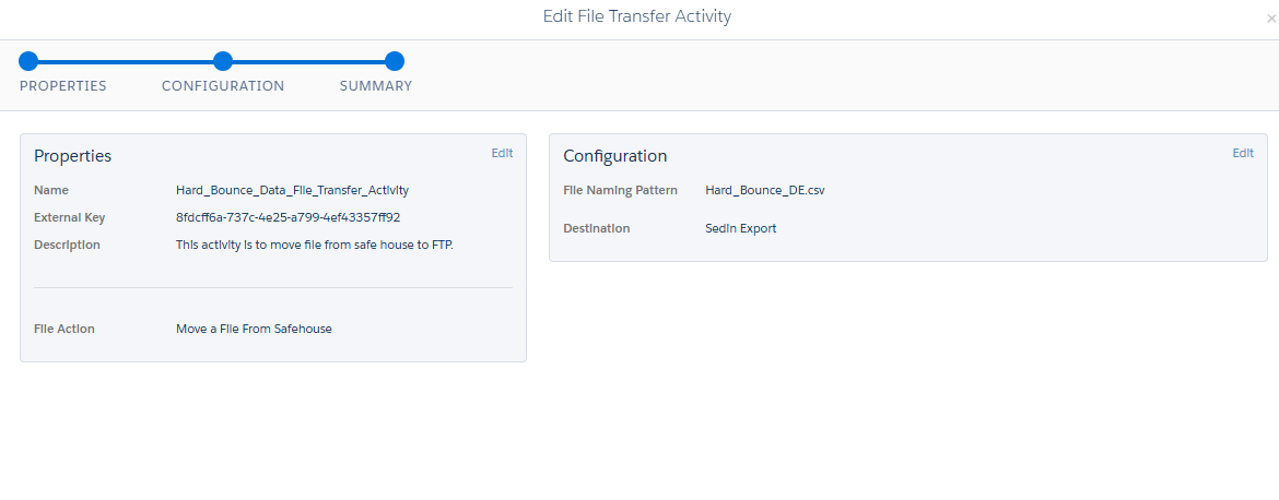
File Transfer Activity
- Drag File Transfer Activity to the step 4.1 and choose it
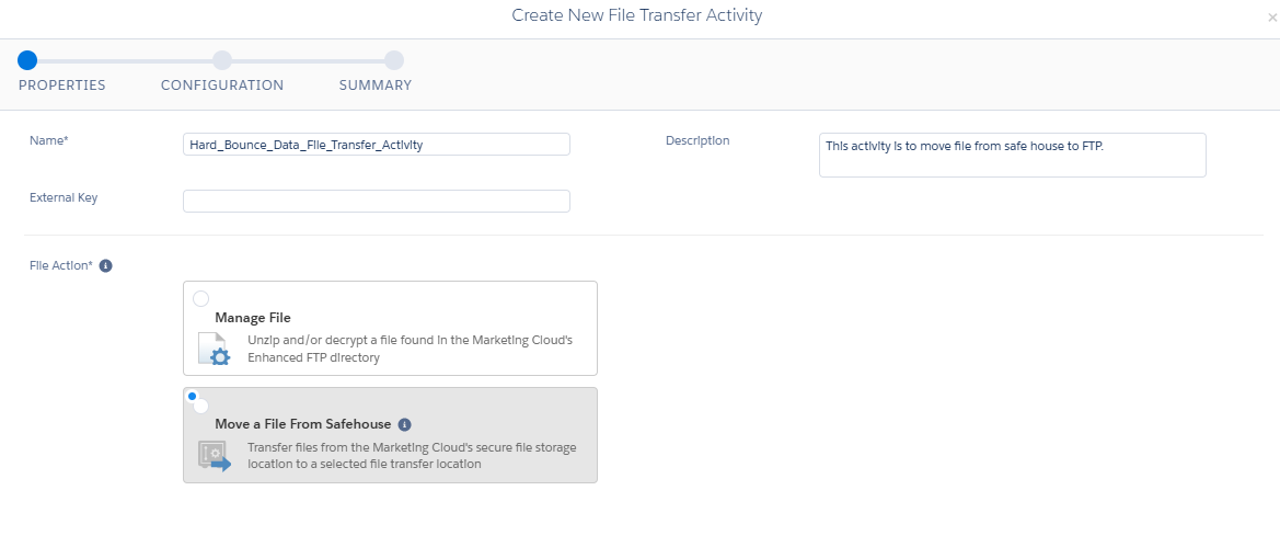
- Create New File Transfer Activity and give Name, Description
- File Action – Move file from safe house and Click Next
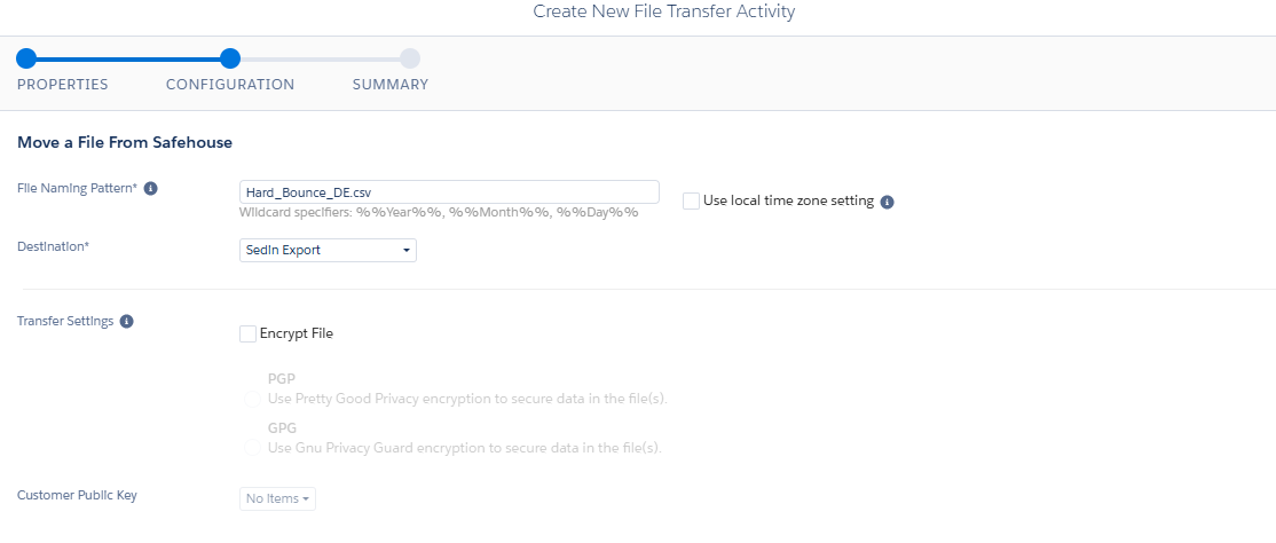
- Give file naming pattern as same as in Data Extract Activity
- Select Destination folder and click Next
- Summary and Finish it.
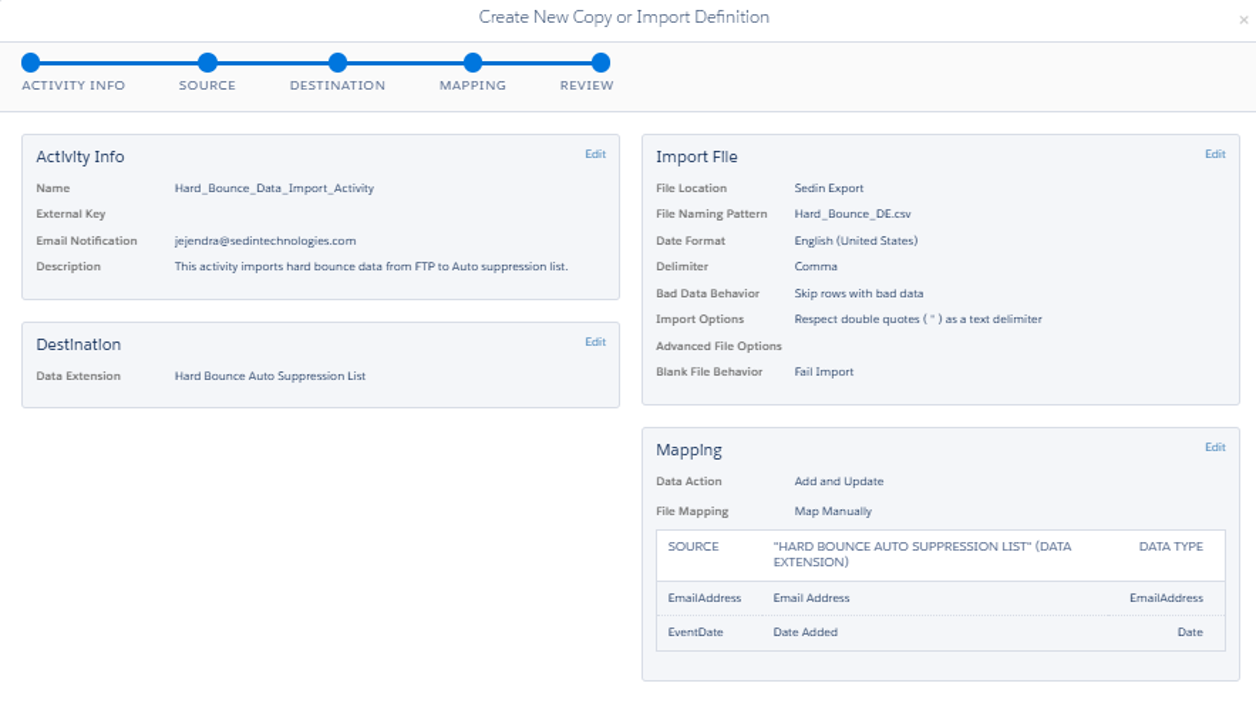
Import Activity
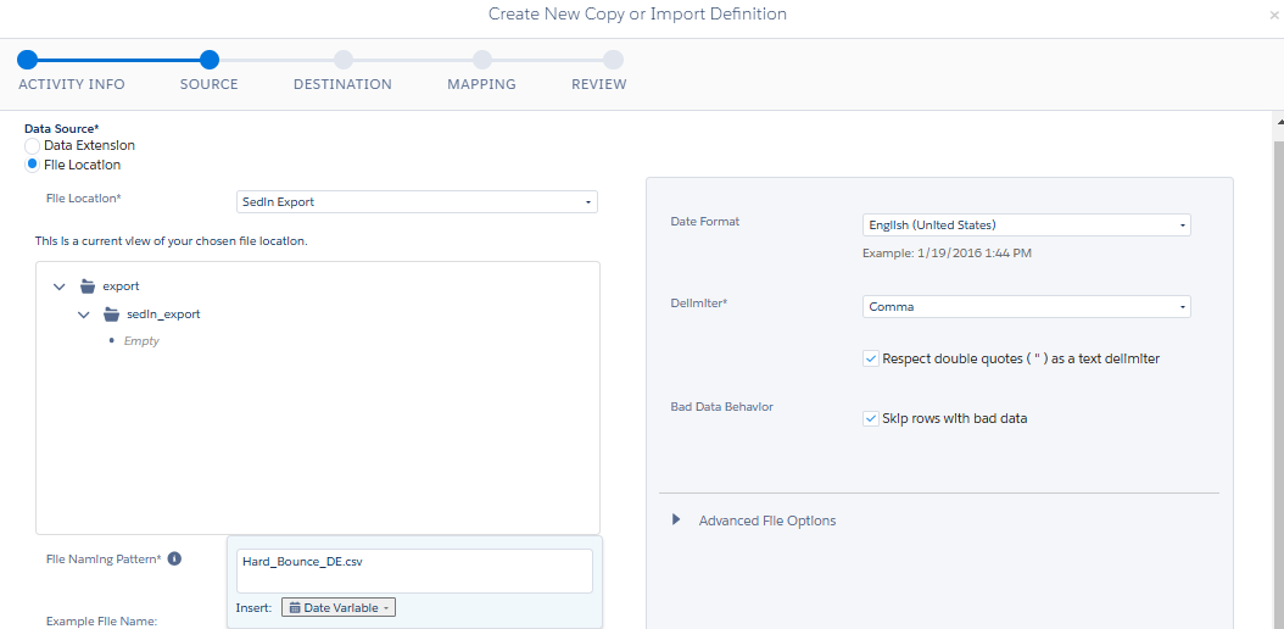
- Drag Data Copy or Import File Activity as step 5.1
- Choose and click Create New Import Definition
- Give Name, Description and give Email ID to get notifications and click Next
- Select Data Source as File Location and choose it, Give File Naming Pattern as same as previous activities and click Next
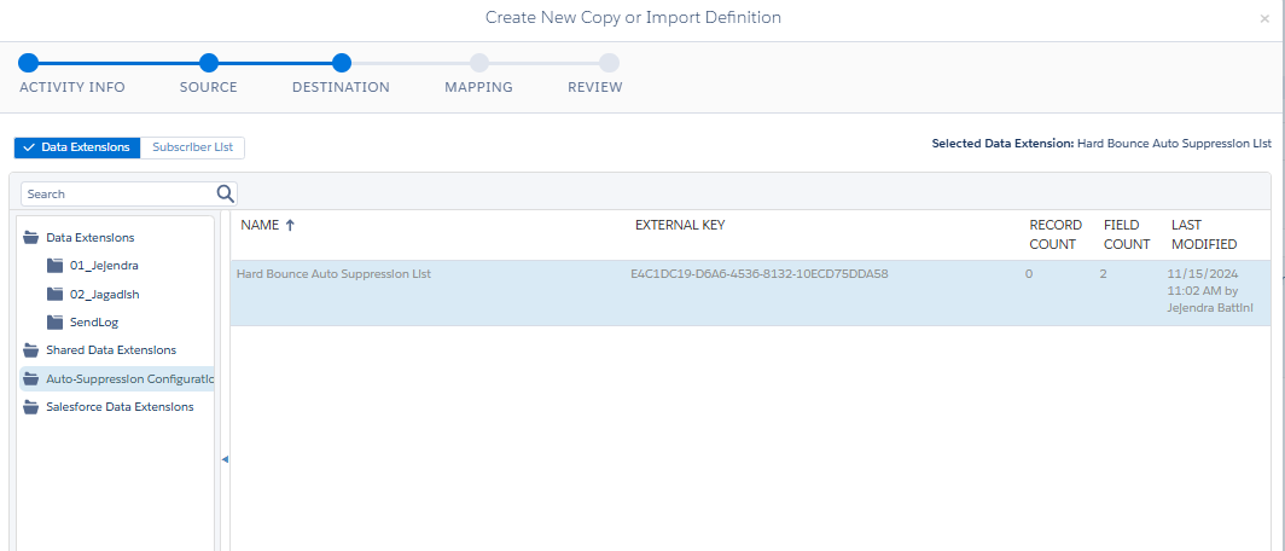
- Select Destination location “Auto Suppression list Configuration list” that we created in Email Studio and Click Next.
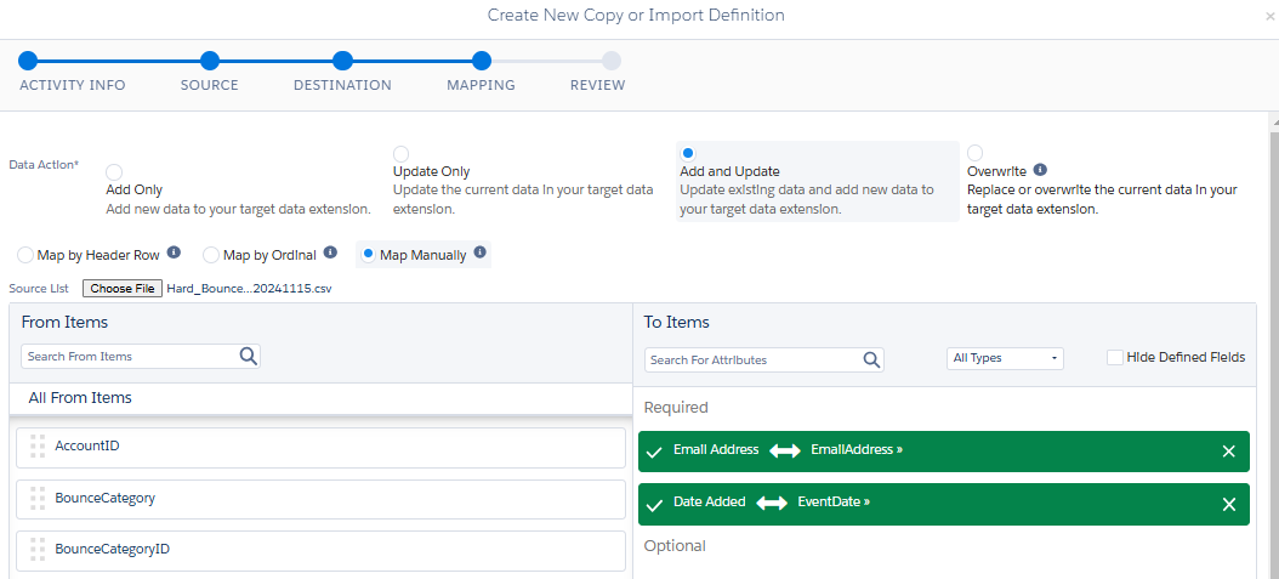
- Select Update Type. Add and Update and map the fields manually Email address and Date Added accordingly and click Next. We can use fields of data extension which is storing Hard Bounce data. export it to our system. Choose it to map.
- Summary and finish

Run the Automation
- Save the Automation and select Run Once. Select All the Activities and Run.
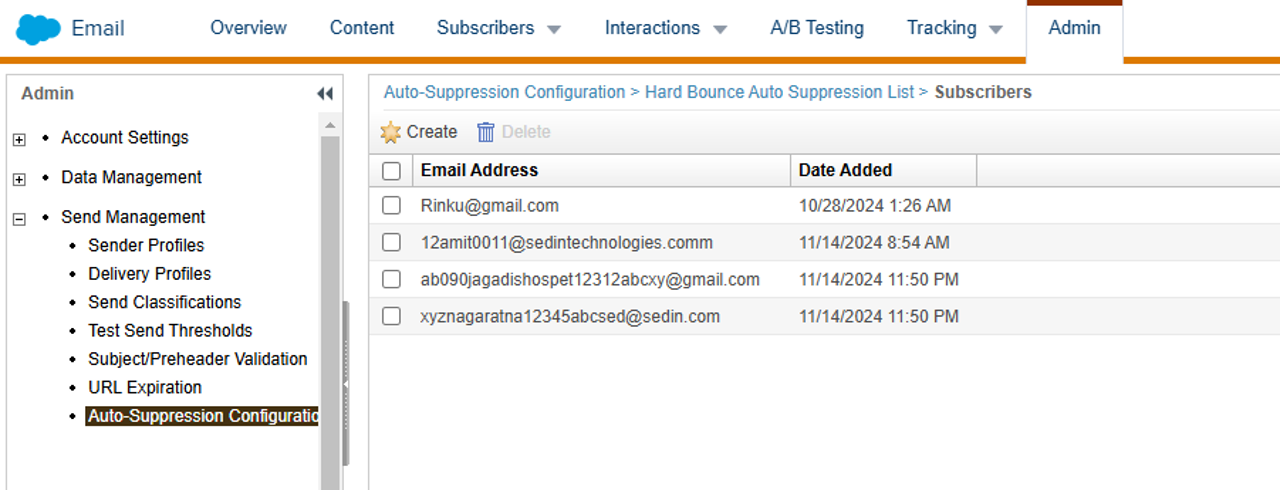
- Once Automation Ran successfully, we can see the Hard Bounce records added to the Auto Suppression list successfully.
Schedule the Automation to Run on Daily Basis
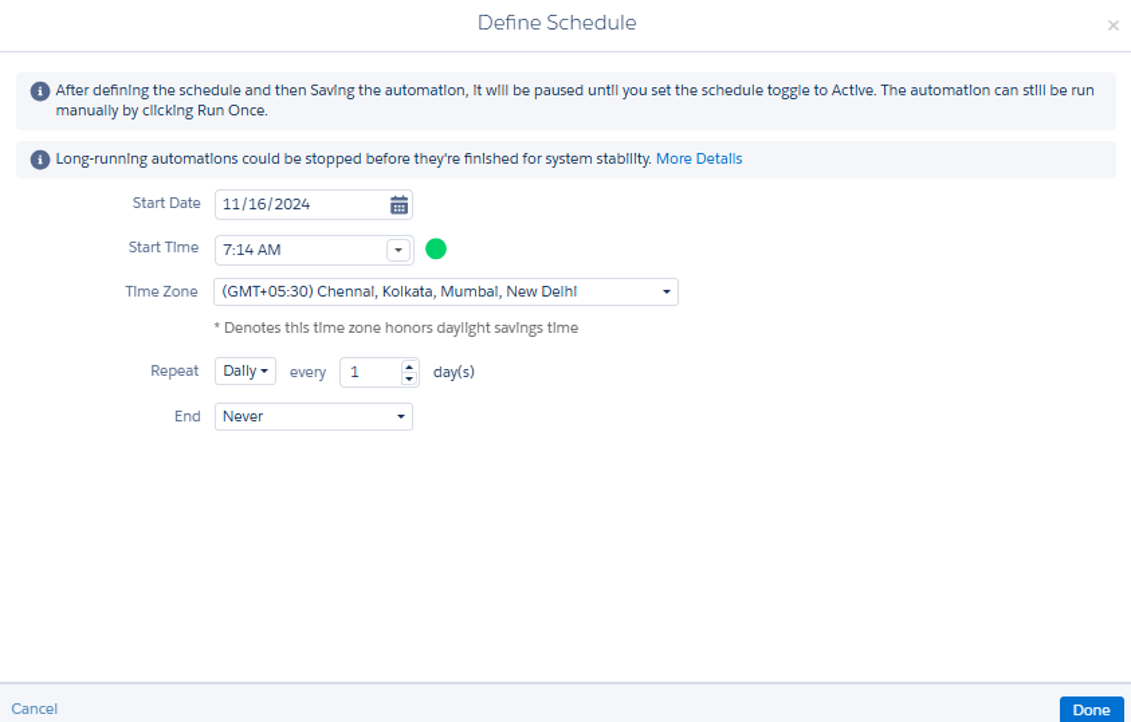
- Schedule the Automation to run Daily once and Done
- Save and Activate

Check the Auto Suppression list Exclusion in the Future Sends
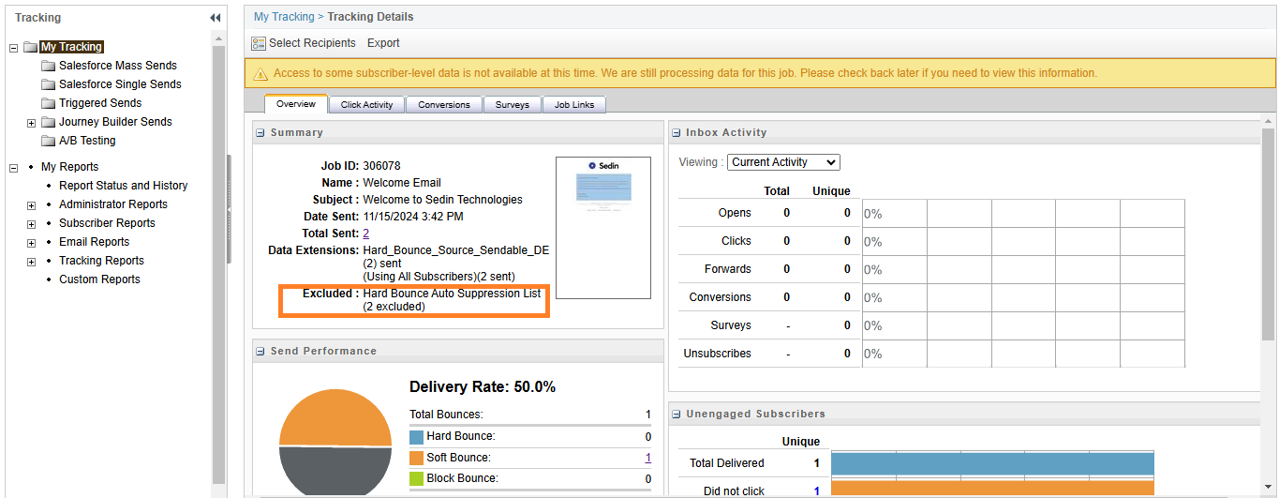
- For future sending, if same record exists in the both Sendable Data Extension, and in the Auto suppression List, will be suppressed automatically.
- Go to Email Studio >> Tracking >> Sends >> Select any one Job which we sent after the configuration of the Auto Suppression List.
Conclusion
Implementing Auto-Suppression in Salesforce Marketing Cloud is not just a technical step—it’s a strategic move to enhance your marketing efforts. By ensuring cleaner data, minimizing bounce rates, and maintaining sender reputation, auto-suppression empowers you to focus on meaningful engagement with your audience.
As your campaigns become more targeted and efficient, the benefits ripple across your marketing performance, from improved deliverability to stronger customer trust. Ready to take your email campaigns to the next level?
Reach out to our Salesforce experts today and see how we can transform your email campaigns! Embrace Auto-Suppression and let your marketing strategies soar.
